Saturday, December 31, 2011

King Mika


Is it not passing brave to be a King and ride in triumph through Persepolis?

Christopher Marlowe


Here is the nutcracker I made for my daughter this past Christmas, she named him King Mika. 


Again, thanks Connie for the pics.  And while I'm thanking people,  thanks to Matt Rushing and Wilson Burnham for all the kind words and support.  They are both talented craftsmen and I wish them all the best. 

And thanks to my wife Cat for her all her help and support.  Happy New Year!


Here is a pic of a Federal Serpentine Sideboard I will be building this coming year.  Keep you posted.

Saturday, December 24, 2011

Herr Drosselmeyer, Christmas Eve


Maybe Christmas, the Grinch thought, doesn't come from a store.

Dr. Suess


Here he is, Cornelius Borealis, finished at last.  I think he came out pretty well.  A special gift for a special girl. 


  One thing that's nice about being a woodworker (and this gets to the Dr. Suess quote) is being able to make things for people that you can't find in a store.  I know, and I am sure that all other woodworkers can speak to this, that this is probably the most rewarding aspect of this craft.  And as the years go by and I am gone, these gifts will mean all the more.  It's memories that make Christmas special, and on that note Happy Holidays to all. 


Note:  I'll get Connie to take better pics next week some time, and will post those pictures as well so check back.   Her pics are magical compared to mine, not even close.

Saturday, December 17, 2011

Hot and Cold, or How Omaha Steaks Fixed My Drill Press

Things fall apart, the center cannot hold....

Yeats, The Second Coming


My last  job was managing a planing mill and one of my duties was running dry kilns and maintaining a wood fired boiler.   So as you might imagine there are a lot of bearings that run 24 hrs a day, seven days a week.  Over time they would break down and need replacing.  To diagnose bad bearings is sometimes easy; they will rumble or create a vibration when they run.  Other times it's hard to tell, usually they will run hotter than other bearings.  A rule of thumb is if you can hold your hand on the bearing for  5 seconds, it's ok.  If it's too hot to do that, change it.  Because it's easier (and cheaper) to change a bearing than a whole shaft, believe me on that.  So what does this have to do with a drill press? 


You can see the bearing on the right the different parts.  This is a pretty
standard roller bearing with an outer race (the band of steel on the outside)
ball bearings ( usually covered or sealed) and an inner race.  It's the inner
race that I gonna talk about today.  This part is what contacts the shaft, so
this has to be heated so the
bearing can be changed.  Sometimes, especially with smaller bearing, you can simply pull them right off with a puller.  Other times, you
have to heat the inner race, which makes the race expand, thus allowing the bearing to be removed.

A rough analogy is a canning
jar.  If the lid band is heated up and screwed on when hot, it cools and tightens up on jar.  If you try to take it off, it comes off with difficulty.  However, run it under hot water and it'll pop right off.  Same principle applies to bearing.  The trick is to heat just the inner race and not the shaft, because if you heat the race and the shaft, then everything expands, which is pointless.  It's the differential that is the key.    If you simply heat everthing up, you really are not accomplishing anything.

So back to my drill press.  The chuck kept falling off, not all the time but enough to be annoying.  I knew how to fix it, but had no practical way to cool the shaft.  But when I got some frozen steaks packed in dry ice, I used the dry ice to cool the shaft.  Wearing gloves, I packed the dry ice around the shaft as best as I could and wrapped it in a towel.  I then took the chuck and put it in the oven at 225º for about an hour.


Below you can see the frost on the towel.


Then, when the shaft has cooled and wearing gloves, quickly put the hot quill on to the cold shaft, couple taps with a dead blow hammer and viola! fixed.  I just hope I never have to take it back off.


Back at my old job, we used to change the bearings on the big planer ( about the size of a pick-up truck) every year or so.  The bearing are 6" O.D. and the shaft diameter ( the size of the inner hole) is 2 7/16".  These are fitted bearings, meaning the hole and the shaft are exactly the same size, thus the only way to remove and replace them is by using the heat differential.  Usually we'd do this in the winter.  By placing the shaft outside overnight when it's -10 or -20, you can skip the dry ice.  Then the next morning we'd heat the bearings up and they would slip right on.  At $800 per bearing, and four per shaft, you really did want to get it right.  Beating them on with a big hammer is not the answer, rather it's simple thermodynamics.  Now I have to change the bearings on my lathe, again.  That's another post.

Sunday, December 11, 2011

Herr Drosselmeyer

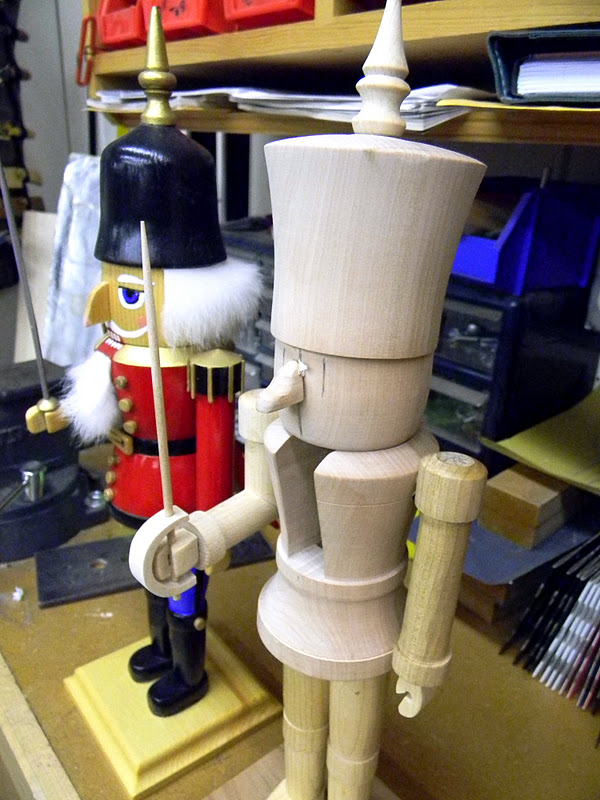
This is a nutcracker I made for my wife a few years ago.  It was a fun project, and my intention was to build one each year.  That was 2007, and now four years later I'm finally getting around to building another nutcracker.  Best intentions and all that, but at any rate, this chaps name is Otto Von Bismarck.

I really did like the project, but I have to admit that painting was a pain, but at the same time if there is any magic (and I do hope there is a little) it's when they are painted.  They really do come to life, pun intended.  The fur by the way is rabbit, and it's worth getting the real thing.


The directions can be found in Fine Woodworking's book Lathe and Turning Techniques.  The process is pretty straightforward, but little differences can add up to a nutcracker with a personality all his own.


First thing is to glue up a blank and turn the main body and hat, called a shako.  I remembered after it was done that I should have used spruce as the face is unpainted and the color of spruce is about right for skin.  I used red birch here and well he'll just look like he had some brandy while standing guard in the cold.


If you look closely, you can see the small brim left on the hat.  I later thought that it made it look too much like a top hat and not a military shako, so I turned it off.  It's little decisions like this that add personality to a pretty standard item.


 Here I turn the arms, two at a time.  Below I'm sizing with a wrench.  I pretty much eye-ball the sizes, but the wrench gives a jumping off point.


Above are the legs, body and arms.  


Clamping up the arm at a 45º angle can be tricky, but tape helps a bunch.  Just lay the points so they touch, put in some glue, and close the piece.  A spring clamp holds it tight for overnight.  Later I'll pin it with a dowel.


A screw clamp helps steady the body for the slot that has to be sawn next.  Two cuts on the big bandsaw, and then I clean it up on the small one.  The big one has a 3/4" blade and does only straight cuts, and the small one has a 3/16" blade for curves and such.  This really does speed things up.


Making the cut


 Above you can see another example of personality.  I cut the hat off and then cut the "head" at an angle so the hat leans back a little, which gives the finished nutcracker a more relaxed pose.


Next saw and chisel the angled slot that allows the crank to rest against the body.  Otherwise it would stick out.


Drilling the 3/16" hole for the crank handle.  An Allen wrench helps as it has a handle.  Be sure to leave the crank big, then fit it and trace the actual body shape and then sand to the line.


Mount the hands on some 1/4" dowels and leave them plenty long to give you a handle to carve with.


Here's a look at the crank.  I enlarged the plans 150% and it was spot on.  Notice how I left the pattern uncut at the top left...this is the part that is trimmed after pinning.


And here he is,  almost done.  One thing I do is all the joints are drilled with 1/4" holes and then joined with dowels.   Just use those dowel markers after drilling one hole.  On the first one I didn't do this on all the joints, and this made assembly a lot harder, plus a couple joint came loose.  Live and learn.

The nose always takes the longest it seems.  I started with a big nose, but it just didn't seem right, so I carved this long narrow beak and I think it looks great.  I'm gonna paint him mostly white, and have a velvet cape made trimmed in white fur.  All the separate things like belt buckles and buttons are painted separately and glued on, which is tedious but does look better.  One thing I noticed is is sword is too short, but that's not glued yet.  Really just gotta keep looking at him and you will see what has to be changed.


I think he looks good so far.  I will post pictures, and his name on Christmas.  I like the sword hilt, and the tipped back hat, and the nose.  Can't wait to see him painted.

I should say here that he is not for my wife, but rather he is for my daughter Erinn.  She is going to see the play in Bangor next weekend, a girls weekend away, so the memory will be fresh in her mind...she is my  Clara.

Sunday, December 4, 2011

A Few Neat Tricks


 I found this the other day on the Internet.  Not the empty potato chip container, a thread on how to sharpen rasps and files.  I use these a lot when I carve the knuckles on my chairs and over time they get dull.  I suspect they actually get clogged with shavings, but cleaning them is next to impossible.   I found this about using battery acid for 5 to 10 minutes and being very careful, all that.  But then I found one that said you could use vinegar overnight and it would do the same thing, and was a lot less risky.  So I filled a container with vinegar, left overnight, and it really did make a difference.


Here you can see the bubbles as the wood jammed into the crevices is eaten away.  This is actually a regular double cut file.  These files are pretty easy to clean with a card file, a small stiff brush.  This file was really dull, so it was a good test for this.


 I cleaned the file and rasps the next day with a stiff brush and baking soda, which neutralizes the acid and provides a bit of grit to clean the file or rasp.  Then I dried them with a heat gun and checked them to see if it made any difference.  With the rasps, they felt sharper but it's hard to tell if they are truly sharper or if they are just cleaner.  Either way they cut better, but I have a hunch that they are sharper, that the acid eats away the dull edge and leave a sharper edge.  But on the file, which was free of debris going in, it really is sharper.  It cuts better and faster, so I guess the process works.


 Here are a couple shots of the files and rasps I use to carve knuckles.  Nicholson #49 and #50, and a cheap one I think from Lee Valley, which actually works really well.  And the file I finish the surfaces with.  I do wish I could carve better, but until that day comes, I use rasps and files. 


 You can see here they are cleaner.  I was gonna order new rasps, that's how slowly these were cutting, but a simple ( and cheap ) fix and they are good as new.  Saves money and resources, which is also good.  One thing I do want to note is when you buy a file, try to find one with a safe edge (no cutting teeth on the edges), that way you can finish right up to an adjacent surface without marring it.  You can see that the rasp below does not have safe edges.


This is where this all leads.  Some people are better at carving and don't have to use rasps and files and I envy they're ability.  But these tools get me where I want to go, so I will continue.  I also think that some look down their noses at this technique, which is fine.  More power to them. 


And in the spirit of recycling, here are a couple pics of a small piece trimmed off a leg I was turning.  I split the pieces from a dead green log, split and then turn the rough pieces in to 2 1/4" rounds, then I let them dry for a few days and then turn them.  Anyway, one problem is end checking.  Usually this isn't a big deal, but by painting the ends with old shellac, the ends don't check at all.  Anchorseal works great too, but then I gotta order it, and pay for shipping   The shellac I had laying around anyway, so again, I save money and resources.  And the shellac works great.  I get the shellac based primer, Zinser.  Plus, when you get Anchorseal on a smooth concrete floor, it's a whole different kind of slippery.  So with shellac you avoid the whole clean up mess.  And, because it's alcohol based,  it won't freeze so I can use it most of the winter.

Below you can see the untreated end and the treated end after a few days in the furnace room, so you can see it really does work.  Wood dries quickest out the ends, which cause stress as the rest of the piece dries, and the result is end checks.  That's one reason why you never check moisture content on the ends of boards.


Unpainted

Painted


 Last trick---take a piece of sandpaper about 4" by 4".  Rip a slot in the center and fold one piece down


Fold that half, now a quarter sheet, over the other half.  Then fold the top single sheet over...


The trick here is that at no point does the sandpaper rub on sandpaper, see below.  It also makes the piece easier to hold and use.   I picked this up from an old painter who worked off and on for my family when I was growing up.