Tuesday, August 28, 2012
Carving the Arms
Nowadays people know the price of everything and the value of nothing.
Oscar Wilde
Here is a great shot of the arm on my newest chair. This is the trickiest part, by far. The trick, or skill, is to get the arris, the edge where the flat falls off, the same on both arms. I like it to form a gentle curve, just like this one. Below you can see how I leave the tool marks on the end and also on the underneath.
People are amazed to find out that I use a drawknife and spokeshave to shape the arms, that's it. I draw reference lines on both arms, just guessing on what will look good. I do both arms at the same time, so hopefully they will be the same.
Then, holding the arm in my shavehorse, I carve to the lines, and then blend the high points to get it smooth. I want the top part flat, so I finish up with a spokeshave and a bit of sandpaper.
Here is the tenon that goes thru the back post. It is a stepped tenon, 7/8" for about 1/4" and then 3/8" all the way thru. This tenon is turned on the lathe, which is pretty exciting as it is an offset turning.
Below you can see the tools I use. The big thing is to keep the arms the same, constantly checking one against the other. They really are hard to do but they add so much visual impact to the chairs that they are well worth it.
Saturday, August 18, 2012
Crest Rail Tenons
Out, out, brief candle!
Life's but a walking shadow, a poor player
That struts and frets his hour upon the stage
And then is heard no more: it is a tale
Told by an idiot, full of sound and fury,
Signifying nothing."
- William Shakespeare, Macbeth, 5.5
I'm gonna touch briefly on the crest for the rockers I make, specifically on forming the tenon that goes into the post. I cut the mortise on a hollow mortiser, which does a great job quickly.
Here's a look at the finished tenon where it goes into the post, nice and neat. The crest is rough cut on the bandsaw and then steam bent and dried. The tenon is formed after the drying, otherwise the size would be off.
I find the shavehorse is the best way to hold the crest, but you could use a vise. The layout is done and the tenon is lined out at 3/8". The back side remains flat. I cut the cove with a drawknife, just proceed carefully and leave the tenon a little thick, then shave or scrape it to size when you assemble the chair. You want a good fit, but believe me you don't want to have to beat it in with a hammer, a tight slip fit is best.
On another note, please check out a great blog by Wilson Burnham, an luthier from Allen Park, CO. He had a great blog here, check it out. I got the idea for the literary quotes from him, by the way.
Thursday, August 16, 2012
Cutting Coves, sort of
I'm bad and I'm going to hell, and I don't care. I'd rather be in hell than anywhere where you are. ”
― William Faulkner
Here are two chairs I just finished up and took to the Gallery at Frenchman's Bay. I have nothing but the highest respect for Curtis Buchanan and Pete Galbert, and their methods, but I am always trying to find faster ways to get stuff done without sacrificing the strength or aesthetic of the piece. I use only hand tools on the seat, and the spindles, but I have found a different way to cut the cove that is located on the back posts on some of my rockers.
Below you can see the cove I'm talking about. I can and have done this with a drawknife, and if I am not in a hurry, I enjoy that method. But sometimes the clock is ticking.
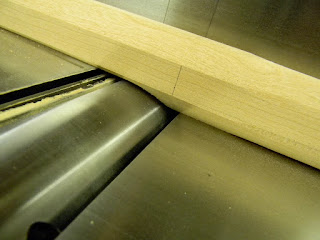
So I use my jointer to cut the cove all the way down the post. The vertical line on my fence to the left is used to change the knives, so ignore that one for now. The line to the right represents the line where the cut ends, and this is the important one.
I should point out that is VERY DANGEROUS! I do it and feel reasonably comfortable doing it, this post is more how I do it rather then a suggestion that you should do it this way. It is a big cut, about 3/8" in one shot, so I am very careful. But it does work, the cove is perfect. You can see the line on the piece that then lines up with the aforementioned line on the fence.
And here's what happens to the pieces that don't come out right, in this case I mis-marked the line on the piece. Does a great job holding up the tomato cage though. Great year for my tomatoes, and zucchini, more on that to come.
Subscribe to:
Comments (Atom)


