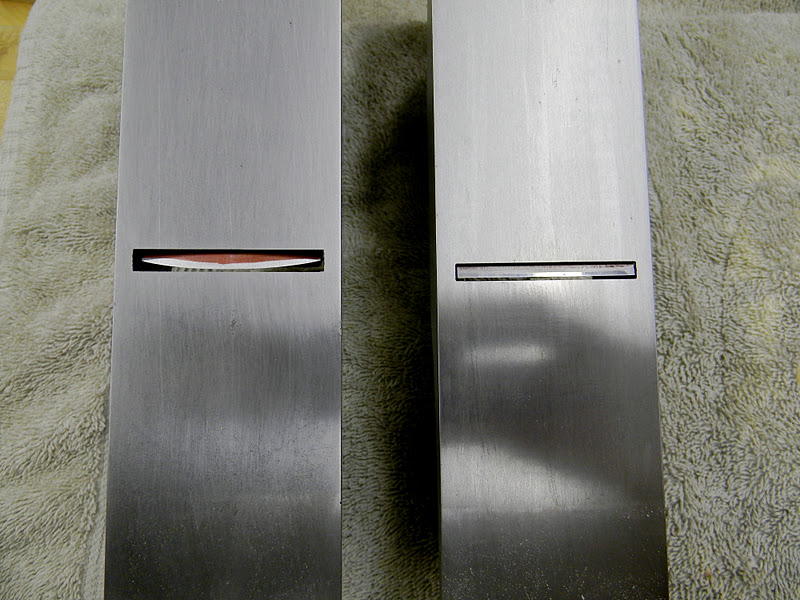
Here you can see a standard store bought scrub plane. This one is a Lie-Nielsen and it is a very nice plane. Since buying it a few years ago, I have discovered a few things. First off, this style of scrub plane is basically French in origin, or at least continental. It doesn't have a frog or blade adjuster, which is fine. It has a big wide open mouth, which is good so you can take think shavings and get the job done. This plane is made to quickly flatten a board, think of it like a hand powered jointer. But there is one problem, it is too short to really flatten a whole board. I think it works better in trouble areas--like a hump or a twisted board that has localized areas that need to be whacked down.
But given that it is so short, it will follow the board, rather than cut the high spots which leads to all the humps being leveled, and thus the board gets flat. This plane does not take fine shavings or leave a fine finish. As a matter of fact, the plane is used diagonally across the grain, so there is gonna be a fair bit of tearout. But this will be cleaned up by the next plane, the jack plane (or better yet a jointer plane). And finally a smoothing plane, but I'm getting ahead of myself.
Here you can see the Lie-Nielsen scrub next to a regular jack plane ( No. 5). You can see the difference in length. The scrub is about 10 inches and the jack is about 15 or so. This may not sound like much but it is. This extra length allow you to end up with a much flatter board. But if you want to
quickly flatten a board, you need to make the blade more curved, a lot more curved.
Above and below I'm getting ready to grind the curve, about an 8" radius. Just set a compass to 8" and scribe am arc on the blade with a sharpie. And then eyeball the angle and swing the blade back a forth, trying as best you can to maintain a constant center. I thought I had a jig for this bit I couldn't find it. At any rate, just swing back and forth. Be sure to mark the bevel with a sharpie so you can keep track of your progress.
You can see below how critical the marker is...getting close here. Of course the middle will be the last to be done.
Above you can see I'm about there, and on the right it's done. You don't need to grind right to the edge, the stones or in this case strip sander will finish it up. Actually there is a school of thought that you should never grind right to the edge, always stop short as the temp at the edge, because it is so thin, can rapidly get hot enough to take the temper out.
Above you can see a great way to cool a blade, simply set it on the support for my strip sander. The aluminum quickly pulls the heat out with worrying about quenching problems. This really does work.
I sharpen the blade on the strip sander with a fairly rough grit. I don't really go nuts on sharpening a scrub plane blade. This tool is not intended to take fine shavings, so save your time and get it quick sharp.
Again, hold the center point and swing the blade back and forth, trying to keep it steady.
This sander works great for sharpening kitchen knives too. I do it free hand and run the burr off by using the inside of the belt. I always amazes me peoples tolerance for dull knives. It seems that if the knife is only slightly sharper than a butter knife, it's ok, but I digress.
Here is how I set the blade in the mouth. You want a fair bit of blade sticking out. Time for a little honesty...the radius on this blade is about 5", which really is too quick a curve. I didn't measure it and after using the plane, I will have to regrind the blade. But the theory is the same. I never measure the thickness of shaving, but you want a pretty thick shaving coming out. Back the frog right off and open the mouth right up.

Here you can see the difference between the jointer plane on the right and the shop made scrub plane on the left. The scrub is used first to quickly flatten the board, diagonally corner to corner, and then the other way, and once it's flat, come back with the jointer plane and get it really flat, and clean up most tearout. You can pick up a decent No. 5 jack plane pretty cheap and grind the blade to about an 8" radius and you have yourself a scrub plane. This doesn't have to be a really nice plane, or even that flat. If you want to spend time tuning a plane, do it to the jointer plane and the smoother, but those are other posts. I honestly use a power jointer to flatten my boards, but if I get a plank that is too wide for my jointer, it's nice to have this ability so you can have a wide table top or bench seat without having to rip it apart and glue it back up.
On the home front, I broke my thumb splitting out some firewood (sledge hammer 1, thumb 0 ) so it looks like small projects for awhile, after Thanksgiving anyway.