Sunday, January 29, 2012

Vineyard Table

The mind is its own place, and in itself
Can make a heaven of Hell, a hell of Heaven.
 
John Milton, Paradise Lost


For the next few posts, I gonna follow a project from start to finish.  I am building a Vineyard Table out of white oak for a friend.  The finish will be fumed so that should be fun.  I got the wood last Tuesday and put it in the shop on sticks to acclimate, see above.
I started by making out a cutting list, and then milled all the parts slightly over size.  I sometimes assume that readers know all this but then I think that sometimes I assume too much, so I gonna do this one like a class.   
    When you mill the stock, run one face over the jointer and then run it thru the planer, jointed side down.  I do try to cut the pieces pretty close to finish size before as it saves time and wood. I do all the ripping on the bandsaw as it is safer and quieter.  Once you get the pieces pretty close, 1/8" over or so on the thickness and width and a couple inches on length.  
 
   On pieces with wane or pieces that are cupped, I joint one edge and the rip it on the bandsaw before jointing as it saves time.  Be sure to rip cup side down. 
   Here you can see the pencil marks I use before and after jointing.  The above ones tell you how the face jointing is going, and the one below tell you which side is done.  
   For boards wider than my jointer, I set the infeed table down for a good bite, say 1/8" or so, and remove the guard and run it over the jointer.  Hopefully this leaves a wide, flat rabbet and a little ridge of wood on the offside. 
     I usually handplane the ridge off and then put that side down and just lightly plane the other side a couple times and the alternate sides till it's flat.  
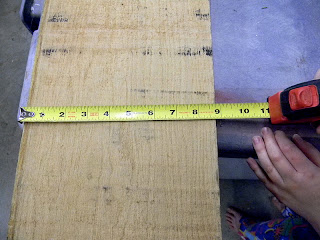
The board with the tape on it is almost 11" wide.  These board will form the top, while the ones below will be the wood for the trestle and legs etc...  It really is a cool looking table, can't wait to get it done.  
And here is my Super Bowl Prediction!  I like the Bills, but my wife and daughter like the Giants, so I'll root with them.


Thursday, January 26, 2012

Making a Tenon Saw

 
The grave itself is but a covered bridge,
Leading from light to light, through a brief darkness! 
 
HENRY WADSWORTH LONGFELLOW, The Golden Legend


I've always wanted a tenon saw.  I did not want to pay a lot of money for one however.  So when I was in an antique shop, I bought a big hand miter saw.  You can pick these up for around $20 but the problem is they are too big, at around 21" long, they are simply unwieldy.  But I thought if I cut one down, it may work.


So I put a 3/32 zip (cutoff) wheel in my 5" grinder and marked a line and in about ten seconds it was cut.  I should say two things here.  First off, if you buy one get a 5" angle grinder.  They are actually easier to handle and much more balanced than the smaller 4" ones.  Second, be careful with a zip wheel.  They can kick back quickly and violently.  I'm kinda lax about safety glasses, but I wear glasses and a shield with these things.  Anyway, quick work.  In the background you can see a flap wheel sanding disc that smooths out the edge.  These also work great on wood, if you can stand the dust. 


I jointed and filed the saw as usual.  For this saw, because tenon cutting is primarily a ripping cut, I went with 10º fleam, 10º rake and about 10º slope.  This is what Leonard Lee suggests in his book, so who am I to argue.  


Here you can see my setup for sharpening, the light is key.  


I usually stone the sides with a diamond hone to take the burr off; again Leonard Lee.


And here it is all done and put back together.  It's 5' wide and 16" long.  I cut about 5" off and it's amazing how it improves the balance.  Before it felt like a chainsaw, but now it feels like a really big handsaw, which...it is. 


It cuts really well too.  The weight is such that it really zips thru the wood.  I'm not sure how much I'll use it; I still prefer a bandsaw but at least I have the option now.


Below are a couple pictures of a Rod Back Arm Chair that was recently selected for the Society of American Period Furniture Makers  gallery show in Hartford, Conn. this spring and summer.  It's one of thirty pieces selected and one of only a few Windsors.  Needless to say I am honored and excited. 


Friday, January 20, 2012

Like New Disston 115 for sale

First and foremost arms are tools in the service of rival nations, pointing at the possibility of a future war.
Alva Myrdal


After much thought,  have decided to sell this Disston D115 panel saw.  This saw is pretty much perfect...the handle is beautiful rosewood.  According to Pete Taren at Vintage Saw, this is the best saw that Disston made. 

It can be found at ebay here.


I have been buying and fixing up old saws.  Maybe I'm just weird but I really do enjoy fixing these up.  I find filing them meditative, weird I know.  Such a simple tool, a handle and some spring steel.

Saturday, January 14, 2012

Sharpening Handsaws

A sharp tongue is the only edge tool that grows keener with constant use.

Washington Irving

When I was a kid we used go to my grandparents house all the time.  My grandfather was a game warden and he also had a wood shop where he built furniture and puttered around.  Two things I remember were his planer, loud and messy, and how he would sharpen his handsaws.  I would watch him with a file and sometimes he would let me try.  Over the years, I got pretty good at sharpening the saws, but then girls and life and school took over and I forgot about handsaws.

When I started woodworking on my own, I did what most do, I bought some Japanese saws and never really gave Western saws much thought.  I did get two nice saws for gifts, a Lie-Nielsen dovetail and a Wenzloff carcass saw.  Both work great, but honestly I never used them that much.  When I did need a handsaw, I use the Japanese saws.  They are sharp and seem to stay sharp forever, so why not.  

Also like most woodworkers, I had a few handsaws laying, or rather, hanging around and this New Years I made two resolutions--wear my seat belt more, and sharpen the saws I had laying around.  Who  knows, maybe I would use them.  I did recently break my dozuki saw, so why not.

Here you can see the results so far.  I should say that I did have a leg up as I had sharpened saws before, but I wasn't really expecting the results I got in very short order.  Five or six saws in and they are sticky sharp and they cut like a dream.  More on that later and also the technique I use.


Above you can see a few pics of a cheap, well, beat up back saw.  I picked it up a few years back at a garage sale for 5 bucks and set it on a shelf and forgot all about it.  So I figured it would be a good candidate for my first crosscut sharpening in quite awhile.  If you are gonna try hand, sharpen a ripsaw first.  The only angle you worry about is rake, the others are 90º.   Crosscuts are a lot harder as you have three angles to worry about if you want to do a good job.
So I got the right sized file and figured the angles and set about filing and....nothing.  The file wouldn't even touch the steel.  I couldn't even joint the teeth.  The steel would just leave a silver streak on the file.  I was at a loss, but as I had been reading Ron Hock's The Perfect Edge where he talks about tempering steel after heat treating.  Best I could figure, some knucklehead in the past had heat treated the steel in the past to make it harder, and rendered the steel too hard.  
So I figured I'd try tempering the blade and if it didn't work oh well, out 5 bucks.  I read Hock's book about tempering and tried it in the oven, 500º for 20 minutes, then I let it cool with the oven door open and the next day, I tried filing it.  This made all the difference.  The file worked like it should, and I set about re-shaping the teeth and sharpening.

For the first filing, I like to take the handle off so I can re-finish it and also it allows me to clean up the blade.  For this blade I had to file the wrecked teeth right off and start fresh, which actually takes less time than you would think.  I stayed with the original setting of 12 tpi.  I did find on the net a print out of lines that lets you sight different lines, that is to say sheets with 12 tpi, another sheet with 8 tpi etc. 


Here are the lines.  Just set it just behind the blade and file right on the line.  I do a light scoring all the way down the blade so that when I get filing I can keep a rhythm going.  Just file until you see a small flat on the top of each tooth.  I will go more into my method of filing in a later post but I will say keep the flats as long as you can.  Another thing I do is shut off the overhead lights and have only a swing lamp shining behind across the flats.  This is critical. 


Like I said, I will go into greater detail later, but the way I file a blade that is in pretty bad shape, one with misshapen teeth and different heights,  is I sharpen right to left, heel to toe (handle to tip) first filing.  Leave the flats, all you want to do is reduce then by half.  I should have said that you must first joint the tops of the teeth to bring them all even, this is what gives you that flats.  So anyway, joint and sharpen from right to left, heel to toe, cutting the flats in half.  Then flip the saw around and file back the other way, left to right, still heel to toe, this time filing to shiny flats right off. 

When you get to the end,  turn the saw back around, and re-joint it lightly, very lightly.   I then set the teeth,  and joint again once.  Now with the heel at your right, file lightly,  to the toe, flip around and do the last filing, left to right, again heel to toe.  This last one should take off the last glimpse of shiny flats and leave a saw that is sticky sharp.

These are the dovetails I cut with this saw, not bad for a big panel saw.  Usually dovetails should be sharpened as a rip, or a modified rip, but this crosscut did ok.


Below you see a beautiful Atkins Panel Saw.  I like Disston, but Atkins' handles are a lot nicer.  The steel is great and the blade is straight.  I sharpened it as a crosscut, 20º rake, 25º fleam and about 10º slope.  Slope isn't necessary but it does allow more sawdust clearance.  I would sell this one if anyone is interested.  Just let me know via comment or email. 


Saturday, January 7, 2012

Unsung Heroes

Mechanization best serves mediocrity.
 
Frank Lloyd Wright


Here are following a few unsung heroes in my shop.  Or maybe tools that I use a lot that I'd like to share with others.  Below you see a couple electricians pliers, end cutters and linesman pliers.


 I use the end cutters to drive the pegs in on my Shaker boxes and then I clip them off.  The last time I made up a batch I couldn't find them and used a hammer and then trimmed the peg off with a sheet rock knife.  I explained this to the E.R. doctor as he stitched up my thumb.  A lot safer to just snip off.  The lineman pliers are handy when you need to shorten a screw or nail.  I cut Sheetrock screws with these (Klein's) and the blades are fine.


Here are those pliers or cutters that normally you use to cut trim and small parts.  I don't really find they work all that great for that, but they do work great for trimming wedges for my Windsor chairs.  Much faster and again safer than trimming with a chisel.


Here's a little tea tin of toilet bowl wax that I use to coat screws before driving.  The thing I like about this was is that it is always soft, so it'll stick to the threads.  I've tried paraffin and I never found it worked that well.


Here is a clamp I use all the time.  I started using these when I used to weld and realized immediately how handy they are.  One really nice feature is they don't shift parts when you clamp them.  I welded a couple big washers on and they work great.  I must have at least a dozen of these. 


 I've shown this before but I sharpen my two turning gouges with this jig.  Works great and very fast.


Every wood worker should have this is for no other reason than to sharpen kitchen knives.  A happy wife makes everything else easier.  And you can sharpen knives scary sharp in about 30 seconds.  And you can sharpen scorps, drawknives, the list goes on.


Here's a Work Sharp disc sander.  I like mine and use it for chisels and block plane blades, stuff like that.  I don't think it gets a blade as sharp as water stones, but, but I do think it gets chisels and the like sharp enough.  And because  it is so fast and easy, I tend to sharpen more, so in the end I end up using sharper tools.  Circular logic, hope that makes sense.  The marker on top is another unsung tool.  If you can't see what you are doing, then how do you know what you are doing?  Keep one handy and you'll see.


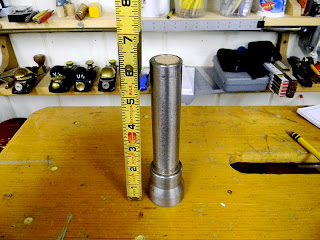
Here's a little mallet that packs a big punch.  It's a piece of 3/4" pipe threaded into a 3/4" to 1 1/4" bell reducer.  I was working as a kiln consultant at a sawmill and a guy in the machine shop turned it down for me and I filled the handle with a wood dowel and the head with lead shot.  I really like this mallet because it packs a punch but allows you to see what you are doing because it's so small.  You can buy these but they are way spendy.  This ones cost, well, nothing. 


 Here you can see the lead shot.  Just fill it up, tape off the bottom of the handle and pour in the epoxy. 


Here's an old fold out rule that was my grandfather's.  He didn't work much wood as he was a potato farmer but he did have this rule and now it's mine.  And I do use it.  Below the tape you can see a couple ink pencils that work great on green wood.  The top one is from Lee Valley and the trick with this one is to sharpen it with a knife, not a sharpener.  The sharpener leave too fine a lead that breaks off.  Use a knife ( I use a drawknife) and keep the tip blunt, and it works just fine.  Below is the Sanford Inkblot pencil and unfortunately it's no longer made.  I have a bunch of these, wish I had more though.  Be careful if you're like me and keep a pencil in your mouth.  The ink will mark your teeth, which looks really smart, especially when you don't know it's there.  Ask me how I know that.


Couple more---a saddle square from Veritas.  I use this all the time, all the time. 


I use these all the time too to set up machines and blade heights, stuff like that.  I see router lifts and fences that read in thousandths, but honestly these are I all I use.  Again, all the time. 


Last but not least, Forrest, the mascot...looks like he's trying to get ink off his teeth.