Saturday, January 29, 2011

Scorp sharpening

 Here's the setup I use for sharpening a scorp, inshave, call it what you will.  I have two, one from Barr Barr Tools and it is sweet, great shape and you can really generate some power.  The blade is almost a circle, not flat like some.  I have a flattish one from Drew Langsner ( in the pic), and it works well, and it is beautifully crafted, but I just prefer the Barr.  But honestly I use both, I just find that the Barr can  do more brutish work, whereas the one from Drew is able to do finer work, one step closer to finish.

At any rate, I struggled for years trying to sharpen these things, with very limited results.  After some very bad results, and out of frustration, I tried this strip sander, there had to be a way.  The problem was the table on mine, from Lee Valley, didn't tip far enough to give the proper angle.  But by clamping a piece of 2x4 to the face, and tipping a little bit, ( I just eyeball the angle relative to the bevel of the blade )  I can sharpen the blade very quickly, and by using the various grit belts that you can get from Lee Valley, I can get it razor sharp.  I don't mean kinda sharp, I mean razor sharp.  It also does a great job on kitchen and pocket knives.
You can see here that I removed the piece of steel that backs up the belt as well.  By doing this, it gives a little flex to the belt, which in turn gives a slight rounding to the edge, so that you can get into a cut and then get back out of it.  It  really doesn't work that well if all the blade does is dig, and keep digging.  You need to be able to start a cut and then lift back out of it, leaving a smooth surface instead of a big nasty chunk torn out.  I use the scorp for most of the rough work on a seat, and actually a fair bit of the final stages.  Always try to work across the grain, and downhill, but let the wood tell you the best way.  Also, try turning off any lights that are right overhead, instead let a raking light show you where the tearout is.  I follow up with a compass plane, and finally a couple different travishers, more on those later.

I should say here that, as much as possible, I'll stick to chair and furniture building.  I read some other blogs, and they always seem so much wittier than mine, and their lives more interesting.  I figure if you want wit and book reviews and diatribes on the virtues of vegan living, you already know where to go.  I won't bore you with that stuff, and while I will mention books ( I do have an English degree) that I like,  or family or dogs, I will try to stay on task.  There, I'll get off my soapbox.

Wednesday, January 26, 2011

Built In


This shows a built-in I built to enclose a pellet stove ( had to do something with oil getting so expensive)  we put  in.  It sat all alone for awhile, and finally I built this surround.  The good thing is the cabinets are on casters, so they can be rolled out of the way if the stove needs to be serviced.  I never realized how out of place the stove looked until the cabinets were done.


Here's a blanket chest/ window seat flanked by closets.  Erinn loves to sit here and read.  Somewhere there's a picture of her sleeping here, I'll find it again.  Put it on my list.  It's a long list.  I like doing built-ins; the thing that amazes me is how quickly people are able to overlook things, like they just become part of the landscape,  like a blue tarp.  And then you finish the project, and all you wonder is why you didn't finish it sooner.  This chest is red birch, hard to find and work, but stunning.

Friday, January 21, 2011

Equilibrium Moisture Content


For some reason, I couldn't add text, so here it is.  The table you see is an Equilibrium Moisture Content chart.  What this charts does it show you, given the temperature and relative humidity ( RH), where the piece of wood's moisture content, given a sufficient amount of time, will be at those environmental conditions.  For example, if the temp. is 120 and the RH is 60, the EMC ( moisture content) will be, eventually, 9.7.  I should say here that I  used to run dry kiln for ten years, drying mostly white pine and hard maple.  While the methods and terminology I used in that industry are a little different, the principles are the same.  The only thing different about a kiln is that higher temps are used to dry the wood faster, but the wood undergoes essentially the same process, free and then bound water are driven off as the MC drops, and eventually the MC falls into the target zone, 6-8 % for hardwoods and 8-10 % for the pine.  As the woods dries, it shrinks and stiffens, and in the case of pine, some of the turpens are driven off, leaving the pitch hard and set.  Think pitch bleed.  The same process takes place when wood is air dried, it just takes a lot longer because the environment can't be controlled.  You're at the mercy of the weather, and if it's raining, you may actually be adding moisture to the wood, even if the wood is in a shed out of the rain.  You must remember that wood is hygroscopic, it always gains and loses moisture to try to equalize with the environment.  A finish can slow the process, but not stop it.  That's why a tight door in August swings freely in February, at least here in Maine.
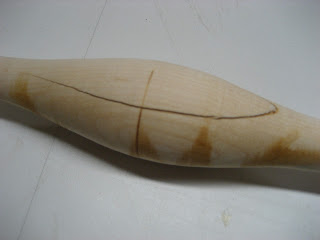
One other thing to remember, and where I'm going with this,  is that green wood, MC above 70 %, say, must be slowly dried at first,  or else you'll get cracks, see the top pic.  The gauge below shows why the piece cracked, too dry, waaaay too dry.  I turned it dead green, and left it in the basement at the conditions on the gauge, which would put the EMC at 6.1, which is way too fast right off the bat.  When I used to run kilns, I would start the maple at 100 F and RH about 90%, EMC about 20 %, not 6.  So, the drying must be slowed down, what to do.  Well, just put the turning in a paper bag for a day or so, this will slow the drying enough to prevent cracking.  In case your wondering why wood cracks when it dries, the wood on the outside of the piece dries first.  And as the wood dries, it shrinks and becomes stiff.  So the outside is dry and stiff, but the inside is still wet.  So as the inside dries, it too shrinks, but the outside can't move as readily, and at a certain point the shrink forces become greater than the strength of the wood and CRACK! the outside gives way.   So choose paper instead of plastic when you stock up for the games on Sunday ( Go Packers and Jets!)  Wicked cold tonite, and the next few days, at least I have a use for the cracked leg, it'll get really dry in the fireplace!

EMC

EMC Table
Relative Humidity Percent Ambient Air Temperature - Degrees Fahrenheit
0 30 40 50 60 70 80 90 100 110 120 130
5 1.4 1.4 1.4 1.3 1.3 1.3 1.2 1.2 1.1 1.1 1.0
10 2.6 2.6 2.6 2.5 2.5 2.4 2.3 2.3 2.2 2.1 2.0
15 3.7 3.7 3.6 3.6 3.5 3.5 3.4 3.3 3.2 3.0 2.9
20 4.6 4.6 4.6 4.6 4.5 4.4 4.3 4.2 3.0 3.9 3.7
25 5.5 5.5 5.5 5.4 5.4 5.3 5.1 5.0 4.9 4.7 4.5
30 6.3 6.3 6.3 6.2 6.2 6.1 5.9 5.8 5.6 5.4 5.2
35 7.1 7.1 7.1 7.0 6.9 6.8 6.7 6.5 6.3 6.1 5.9
40 7.9 7.9 7.9 7.8 7.7 7.6 7.4 7.2 7.0 6.8 6.6
45 8.7 8.7 8.7 8.6 8.5 8.3 8.1 7.9 7.7 7.5 7.2
50 9.5 9.5 9.5 9.4 9.2 9.1 8.9 8.7 8.4 8.2 7.9
55 10.4 10.4 10.3 10.2 10.1 9.9 9.7 9.5 9.2 8.9 8.7
60 11.3 11.3 11.2 11.1 11.0 10.8 10.5 10.3 10.0 9.7 9.4
65 12.4 12.3 12.3 12.1 12.0 11.7 11.5 11.2 11.0 10.6 10.3
70 13.5 13.5 13.4 13.3 13.1 12.9 12.6 12.3 12.0 11.7 11.3
75 14.9 14.9 14.8 14.6 14.4 14.2 13.9 13.6 13.2 12.9 12.5
80 16.5 16.5 16.4 16.2 16.0 15.7 15.4 15.1 14.7 14.4 14.0
85 18.5 18.5 18.4 18.2 17.9 17.7 17.3 17.0 16.6 16.2 15.8
90 21.0 21.0 20.9 20.7 20.5 20.2 19.8 19.5 19.1 18.6 18.2
95 24.3 24.3 24.3 24.1 23.9 23.6 23.3 22.9 22.4 22.0 21.5
98 26.9 26.9 26.9 26.8 26.6 26.3 26.0 25.6 25.2 24.7 24.2

Version 1.0.5

Wednesday, January 19, 2011

Hit the brake

 This shows splitting some ash for spindles, rails, etc..   One thing that can make ash tough to split is, ironically, the fact that it split so well.  What I mean by this is that it tends to just pop right apart, so the degree to which you can steer a split is somewhat limited.  By steering I mean usually you try to split parts in half, equal mass on both sides of the froe blade.  On an earlier post I talked about the froe, now more on the brake and how to split.  The brake is made of 2x12's and has holes drilled thru it to hold pipes, which in turn holds to pieces of wood.  I really helps, I'm not sure how you would do it otherwise.  Anyway, with the brake holding the piece, the froe goes to work splitting the wood.  What you always want to do is put the heavy side of the piece down, towards the ground, and pull down on the froe handle.  This will actually move the split, causing it to move towards the heavy side.  Watch the split as it progresses, and you may have to flip the piece a few time before the piece is rendered in two.  This process can take some getting used to, but once you get it, you can split pieces closer to the finished size, no more making spindles out of 2x4 sized pieces! 
 This happens often, and as I've said, you always want to split pieces with equal mass, so what to do. Well, what I do is to flatten one face with a drawknife, and then pencil some lines,  roughly in thirds in this case, then I rip the pieces on the bandsaw, carefully following the grain.  I have tried to split off one third, but haven't had much luck.  So I bandsaw them out, and then work them with the drawknife, carefully following the grain.  Try to split equal pieces, but when you can't, as long as you saw carefully, you can make spindles that are perfectly alright, and save wood in the process. 
One great thing about having a five year old, well, there are a lot, but one is that everything gets painted, everything!  Which is great, and, TADA!!! here is my splitting brake,  froe, and froe club.  I turned the club from a piece of horphobeam ( hornbeam) that Jeff Hemphill gave, the same guy who gave me the froe.  Never hit the froe with a metal hammer, you can break the blade, plus you'll mushroom the backedge.   So get some 2x12's, cobble up a brake, and get a froe and split some wood.  This simple act is critical to the strength of the chairs because the grain runs all the way from one end to the other.  Sawed lumber has grain runout, whereas split pieces are much stronger because the grain runs all the way.

Sunday, January 16, 2011

Cherry Dresser

Cherry chest of drawers I built for our daughter Erinn.

Same dresser, note how the dividers are dovetailed into the sides.

Saturday, January 15, 2011

Reaming

 This is the basic setup for reaming legs.  Your looking at the bottom of the seat, and the sightlines have been transferred to the bottom.  The leg holes have been drilled ( 5/8), and I have the square, bevel gauge and reamer ( 6 degree) is in the hole.  The reamer works like a charm.  It is a turned piece of hickory with a slot cut in it, and in that slot is a piece of steel sharpened like a scraper.   One big advantage is that the scraper cuts from both sides, so it always stays centered in the cut.   I got mine from Elia Bizzari at handtoolwoodworking.com.  He sells these reamers and the matching tapered rounders, which also work great.  By using both tools, you get a perfect mating when the leg is inserted.  There are several reasons for tapered tenons.  Once you get comfortable with the reaming, you can fine tune the legs, stumps for perfect alignment.  It also makes assembly easier, and when you insert the leg, the glue doesn't get squeezed out.  Then you split the end of the leg and insert the wedge, and that leg will never come loose.  Add some stretchers, and you have an undercarriage that will last generations.  But more on the reaming.

 Here's the look down the gun barrel.  The square is aligned with the sight line, perpendicular to it, and the tip of the reamer is then aligned with the square.   The easiest way is to line up the square with the sight line, then find the tip and ream until it lines up.  As for the tilt out, lay the bevel gauge on the side of the reamer  (remember to set the gauge to three degrees less than the desired angle, half of six) and ream to keep the angle correct.  Its easier to do than I've indicated here... practice on some scrap until you become comfortable.  A couple other things.  I used to shape the seat and then ream, but now I ream while the seat is flat.  After reaming and adjusting, I then saddle the seat.  Its really easier, and I've never had problems tearout around the holes.   The other tool is the bevel boss angle finder.  I first used it on boats, before I started chairs, and it allows you to set the angle quickly and accurately.

This is a shot of a dummy leg, simply a 1 1/4 strait turning that has been reamed on the end.  I have a couple of notches turned into it.  As I ream, I test the reaming depth with the dummy leg,  and once the end peaks out, I set a second bevel gauge to the height of the notch, and use this second gauge to make sure the four legs are reamed to the same depth. 
I've tried other methods, and this is by far the easiest and most accarate.  Now I just have to find a buyer for my old reamer.

Thursday, January 13, 2011

Tuesday, January 11, 2011

Nice Legs


Here are some, most actually, of the legs I turn for various legs.  From the top down--baluster, Philadelphia, modified Philly ( used sometimes as the back legs ) vase, bamboo, and lastly  double bobbin.  All the legs are turned from green, split maple.  The legs stock is split so the grain end to end, this results in a much stronger leg.  Factory legs are made from sawed stock, and as a result often the grain runs out, resulting in a broken leg.


Here are the legs that don't pass muster, my daughter paints them (sparkly pink and sparkly purple, nice job, I'd say.  This way I don't feel so bad about screwing one up.  Watching my daughter learn to skate ( she's 5) reminded me of when I learned to turn.  I fell down a lot, and most days I felt I blew more details than not, but I kept practicing and falling, and practicing and falling.  And while I still fall every now and then, it's a lot less then before.  Like I said, turning can be a frustrating skill to master, but so is skating.  Just keep at it, you'll be doing a triple lutz before long.  And if you can't do it, contact me and maybe I can help you out.  Keep at it.

Sunday, January 9, 2011

Glass Door Linen Press

Couple images of a Cherry Linen Press.  Based on a piece from the Shaker community at Pleasant Hill, Kentucky.

The original had blind (solid) doors, I added the glass so one can display dishware or collectibles. 

Saturday, January 8, 2011

Blanket chest

Cherry Blanket chest with 64 dovetails and handturned knobs.
Dovetail drawer
Bread board end

Hide Glue, part 2

 Here's how I set up to test a batch of glue.  I take a 1x6 pine or whatever scrap I have on hand, and hand plane one face.  Then I rip it into three pieces, and then crosscut into six.  I then face glue, offsetting by roughly thirds and clamp overnight with spring clamps.  I should say here that, contrary to some beliefs,  most glues hold better the smoother the surface they are bonding.  A lot of people think that they have to rough the surface up to give the glue some bite, but this is not the case.  Sanded smooth is good, but a hand planed surface is the best.  The exception is epoxy, which bonds in a different way--the surface needs to be abraded and held together with clamps, not clamped all that hard.  Same goes with hide or carpenters, squeezed but don't go to hell with the joke.
 The next day I give it a good whack with a hand sledge, and keep whacking until something breaks.  As you can see, this batch of 305 hide glue passed with flying colors, 100 % wood failure, which is what you want.  I do this with every batch of hide glue or every bottle of PVA glue, just so I know.  I put waaaaaay too much time into projects, and it's my reputation on the line, to have stuff fall apart because of faulty glue.


Hide Glue

 I use hide glue for most of the chair joints, save for gluing up the  seat and the hand piece ( for these I use Titebond III).  Hide glue has several advantages, chief among being the fact that it is reversible.  So if something breaks or comes loose, the glue can be taken apart with hot water and or a little judicious steam.  Then glue can be reapplied and the joint reglued, ready for another good long while.  The Egyptians furniture was glued up with hide glue, and it  is still around today.  Carpenter's glue, on the other hand, doesn't stick to itself once it's dry, so to reglue you have to scrape right down to bare wood, which is a pain, and it can cause sizing problems.  But hide glue, because it is protein based, will adhere to itself and reactivate, being just as strong as when first done.
Another advantage is that hide glue has a long open time, meaning once I start a glue up, I have about a half an hour to complete, and if something doesn't go right, I can pull it apart and check, and then reassemble, and I don't have to worry about carpenters glue grab, the way that it will seize a joint after about ten seconds and won't let go.
I cook up me own glue, which is super easy and allows me to always have fresh glue.  I use 251 gram or 305 gram glue, a measure of the strength.  305 is typically used on the neck joints of guitars and violins as they are under constant pressure.  It's the most expensive, but for a chair I figure why not.

The basic recipe is really simple, consisting of one part salt, two parts glue flakes, and three parts water.  First day, combine the two parts glue with the three parts water, stir and let sit overnight.  The next morning, cook the glue at 140 F for two hours, adding the salt once it turns liquid.  The salt makes the hide glue liquid at room temperature.  Stir the mixture occasionally.  After two hours of cooking, put in the fridge for overnight.  The next morning, heat up again at 140F for two more hours, and after that your done.  As you can see I use a double-boiler on a hot plate and a candy thermometer.  Be careful not to go over 140 as it will ruin the glue.  And always do a glue test when the batch is done, more on that in the next post.

Thursday, January 6, 2011

Drawknife sharpening

 This shot shows how I currently sharpen my drawknife.  The block is two pieces of MDF face glued and sized for the sheet of automotive wet/dry sandpaper.  I use the half sheets for this block ( I get mine at W-Mart).   Then I affix a piece of 120 grit self adhesive sandpaper to one face and a piece of leather to the other.  The sandpaper serves only to hold the wet/dry paper on.  That means no messy adhesive and I can quickly change sheets when they get worn.  I charge the leather with green polish.  I like to use this bench vise because it gets the "stone" up, allowing the handles to clear and lets me put pretty good pressure on the blade.  So all I do is take a sheet of 800 grit, run the blade over a few times, flip the blade, repeat, and then I switch to 1000 grit.  Those are the only grits I use, 1000 is plenty sharp enough.  Then a few passes on the leather and the blade should be razor sharp.    The leather not only takes care of the burr, but it also puts a slight, and I do mean slight, roundness to the edge, which allows you to enter and, more importantly, exit the cut.  If the blade is sharpened like a chisel, without this rounding, it will only dive in, you can't back it out of a cut.

 I used to use a waterstone in much the same manner to sharpen a draw knife, and while I could get it as sharp as the sandpaper, actually sharper, for whatever reason, it would dish the stones wicked bad.  It seemed I was spending more time flattening the stone than using the stone, so I switched to the sandpaper and MDF block.  I have two other size blocks for spoke shaves ( I lifted this idea from Dave's Shaves).  The really narrow one is for a sweet little spokeshave that Dave's Shaves makes, I use it for the tight cove on the side  of a shield seat.  And the wider one is for a wooden spokeshave I made years ago, my favorite.  But the main point of this set up is to sharpen the drawknives, and it fits the bill--quick and effective.  Note of caution--drawknives are razor sharp and bloodthirsty, they will really open you up, so be careful!!   I used to keep them on a cart that was about  shoulder height when I was seated on my shave horse.  Problem was when I reached for the drawknife, I was reaching across the blade.  After two bad cuts, one really bad, I now keep them on a low bench so now  I have to reach down to get the tool.  Be careful!!

Wednesday, January 5, 2011

Seven little indians

 Here's the family, Erinn, Cathy, and newbie Brenna, and below all of us, including Ryan, son and defensive end.  This is what it's all about.

Forrest

 Meet Forrest, the shop mascot.  He's slowly coming back into the shop.  A few months ago, he slipped on the concrete and tweaked a leg, and ever since then he will only sit by the door and whine.  So a couple days ago I got serious about getting him back.  Straight up bribery, in the form of milk bones. And it seems to be working, hopefully.  I love having him in the shop.  He used to sleep under the lathe, he'd get covered but he loved it.
The milk bones box reminded me of a conversation I had a few years ago.  In another life I ran dry kilns, drying pine, maple, birch and some ash.  I was in the control room, and a couple guys who knew the owner were visiting, and he was showing them around.  The kilns are controlled with a two-pen circle charts that regulate and track the temperature and humidity in the kilns.  Dry too fast, and the wood cracks and checks and develops tension.  Dry too slow, and you can get mold and waste time.  Anyway, one guy recognized the circle charts, and said that he used to run an oven that dried dog bones in Alberta, big long 100' oven.  And he also had to control the temperature and humidity in the oven, dry too fast, and only the outside dries, and the inside will rot on the shelves.  Dry too slow, and time is wasted.  I thought it was cool that he and I dried very different things with the exact same controller.  Anyway, meet  Forrest.

Tuesday, January 4, 2011

Turn, turn, turn

 Here's the basic assortment of tools I use for turning.  Pretty standard stuff, really.   I keep the cart right behind me and to my right ( I'm a righty) and I always put the tools back on the cart in the same place, and lately I've noticed that I can find the tool without having to look.   I use the big gouge (far left) to rough out the blanks and do the heavy material removal.  Next is the smaller gouge, probably the most used tool.  I use it to do heavy removal, final shaping and everything in between.  Then is a 1/2  gouge, almost never used, and then a couple 3/8 gouges with the handles trimmed (more on that), parting tool, and a couple of razor sharp skews.  I use the open end wrenches to size tenons and the WD-40 is used after turning green wood.  I spray a little on the end of the tool when I finish up for the day, it prevents rust, and aids in gunk removal. 
 Here you can see the different grinds on the 3/8 gouges.  The one on the left works great cutting right in on a birds beak or to define a detail, but it is wicked grabby when trying to do long flowing cuts.  That's where the shorter grind on the right works great.  It really cuts sweet, but it's hard to do really fine detail, so I use both.  A lot of guys say it's faster to use fewer tools, and while that may be true, blowing something up and having to start over doesn't exactly save time.  I say use whatever you have to to get the job done.  I use the skew some, but usually I finish with sandpaper after letting the piece dry for  a couple days. 
Here are a couple further modifications to the two aforementioned gouges.  I could cut the left side bird beak cove just fine, but when I came to cut the right side, my body got in the way when I would try to switch sides, and after many frustrating transitions, out of frustration I cut the handle off  (I have since seen a picture of this somewhere)  and boy what a difference.  Not only does my body not get in the way, but it's faster to swing the tool around.  Another thing I do is point my index finger right down the shaft of the tool, it opens up my wrist, and allows faster swinging. The skews need to be super sharp, but when they start to vibrate, it's very frustrating.  So I do the best I can, and then finish off with sandpaper.  I should mention that I'm a good turner, but far from great.  I have struggled with it from the get go, and do screw up more than I care to admit.  But I can turn baluster legs now that pass muster, so I'm almost there.  One great use for screwed up legs--my five year old loves to paint them, sparkly pink and sparkly purple, of course.  So if you screw up some legs, give them to a kid to paint, you won't feel so bad about it.  And kids love it.  Win-win.  Turning can be a very frustrating skill to master, keep at it and practice, practice, practice.  Every skill is eventually self taught.

Monday, January 3, 2011

Evolution

 Here are two clocks that I built twelve years apart.  Can you guess which one was the first?  Right, the top one.  While nice, it is easy to see the evolution of form and the improvement in skill level.  Also, a better eye and sense of proportion give the bottom clock, well, quite frankly, it's just a while lot better.  The pieces are in scale with each other, the golden ratio is at play, I could go on.  The point is not to point out how nice my current work is.  The point is that everything evolves, skills, joint cutting, everything.  If you do anything enough, and long enough, you get better and faster, be it turning a leg or playing clarinet.  Think of when you get a new remote for the T.V.. You look at the directions, press a button, stare, read, press--and after two months you can change the channel, Tivo, and check the weather without the lights on.  So don't be afraid to tackle a project that you think is over your head, it is the only way your skills will evolve.   You will get there, just always do your best and the results will improve.
One pitfall that should be avoided is to overbuy tools, and especially jigs.  And I'm as guilty as anyone, maybe more.  Beware the siren song of the magic jig, because every jig you buy or build has a learning curve (remember the remote?) and if one jig doesn't work as effortlessly as advertised, it usually gets relegated to the shelf, or replaced with a newer, even easier jig, but this one isn't any better.  Like I said, everything has a learning curve, and if you are constantly changing the tooling, then you really can't learn the skill.  I think, and it's only my opinion, the best way is to pick a method or a jig, and stick with it, learn it, and even if it's not the best way, eventually it will become your best way.  I must have four different jigs for dovetails, and I have tried every conceivable way to cut them, but after a while I realized I was only learning different ways to cut dovetail, not coming up with an efficient way to cut them.  So I picked one way to cut them, and I do it that way every time, every time.  It may not be the best way, but it's my best way.

Sunday, January 2, 2011

Prometheus

 For me this is the best part.  The chair is done, everything worked  out (hopefully), and I've carefully applied five layers of milk paint, black on red in this case, and the only thing that remains is to rub out  and apply the top coat.  I rub out with a gray scuff pad ( I get mine by the box from an auto parts store) and then rub out again with 0000 steel wool, rubbing until my hands cramp up.  The shot below the luster is from just rubbing out the milk paint, no top coat.  That's how shiny Old Fashioned milk paint can get, love it.
The top coat is three to four coats of a wiping varnish.  The first coat is 1 part thinner, 1 part spar varnish, and 2 parts linseed.  Subsequent coats are 1-1-1.  Just wipe it on, wipe it off with an old t-shirt.  Looks great and super easy.

Silk purse

 This is where it all starts, for the turnings anyway.  This is hard (sugar) maple, and lots of it!  The guy said they had 2,000,000 bdft. of logs here, and somewhat less birch.  I always buy hard maple, it's perfect for turning, and with a selection like this why not.  What I look for is 20-24 inches on the butt, clear, straight with a small heart.  I went to another yard today and found a hard maple that was 16' long, 26" on the butt, and the heart was about 2", wow.  And a good price to boot.   I hear that some chair makers in other parts have a hard time finding hard maple, but way up here in Northern Maine, it's not a problem. Lately I've been buying my maple from a firewood supplier, he's right in town and he has more than enough hard maple. 


For the steam bent parts and spindles, I use mostly white ash, although red oak will also work.  It works reasonably well with hand tools, and it bends like a dream.  I'm gonna see just how far I can go with bending someday, should be a fun post.  The ash logs are fewer and farther in between, but they can be found. I always look for veneer quality logs--straight, centered pith,  no bumps or visible defects.  One defect can be twist.  I'll get a log and it will look great, and when I split it one half will be say 9 and 3 (imagine a clock face) and by the time it gets to the other end, the half is at 11 and 5, no kidding.  I used to try to use it, but these days it's firewood.  I go thru a lot more logs this way, but I only want to work with quality wood;  you can't make a silk purse from a sows ear.

Saturday, January 1, 2011

Breakfront

Cherry Breakfront
Crown Molding

Corner detail
Dovetail drawer

Picking out the nodes

 Here's a shot of the technique I use for painting the small rod back Conifer Green.  Like all things I know how to do, I learned by making mistakes.  I like to pick out the nodes on the bamboo legs and such (these are made by a quick V-groove cut with a skew at the lathe, the deeper, the easier to paint) and the first time I did it, it picked them out with a small paint brush after painting, never again.  Now I paint the chair Mustard or Marigold milk paint, then I paint it barn red.  The Conifer (or peacock or whatever) just doesn't seem to cover the yellow.  So a coat or two of barn red over the mustard, and if the conifer doesn't cover, the barn red actually looks good coming thru the top color.
 Here's a good look at the yellow nodes on the legs and stumps.  Another trick is to mix the milk paint fairly thick, say 2 parts powder to 3 parts water, and when I paint, hold the brush at a fairly flat angle relative to the leg, in other words, so the handle is almost parallel to the leg as opposed to perpendicular.  This keeps the paint out of the groove.  Also, run the brush fairly dry.  I keep some newspaper handy to dab the brush on when I think there's too much paint in the brush.  The gutter usually has to be touched up a little, the groove is too wide to keep the paint out.
Here's the last hint, a round, densely packed brush from Lee Valley.  It's the mixed bristle 21mm size.  I cut the handle at about 5 inches so it doesn't get hung up on the undercarriage.  The shape and densely packed bristles makes it a lot easier to paint round stuff like the spindles and legs etc..  the bristle don't split apart like a regular flat brush will.
Another thing is to resist the temptation to touch up the paint as you go.  If you miss a spot or if something doesn't look right, it's usually better to leave it, and fix it on the next coat.  If you fix it right off, you end up with an extra coat which stick out like a sore thumb.  Believe me on this one.