Showing posts with label Skills. Show all posts

Wednesday, March 2, 2016

Spindles


He sat for a long time. When he climbed back up the ridge to the cedars to where he'd left the horses the captain was sitting on the ground and he looked badly used up. 
Let's go, he said
The captain looked up. I can go no further, he said.
Let's go, he said. Podemos descansar un poco mas adelente. Vamonos.


Cormac McCarthy, All the Pretty Horses


Making spindles. Lots and lots of spindles for a bench going to Alaska. The bench is is going to be a clear finish so I have to be extra careful about picking only sap wood ash and nice strait grain.  Luckily the ash log is absolutely beautiful (pics soon).


I did take a minute to replace the maple wear strip on my spoke shave. You can see how much wear it was gotten over the years ( this is number 6 I believe). I could use a brass plate easily enough but I actually like the groove that develops. I centers the spoke shave and allows for shallower cuts to the left or right.


Here you can see clearly the arrises of the octagonals that form the spindle. When I'm at this step I kill the overhead lights and use a single incandescent bulb in a stand. This casts a raking light that allows me to easily see the eight facets of the spindle. Only 28 more to go.


Wednesday, February 26, 2014

Measuring Stretchers


“I was depressed, but that was a side issue. This was more like closing up shop, or, say, having a big garage sale, where you look at everything you've bought in your life, and you remember how much it meant to you, and now you just tag it for a quarter and watch 'em carry it off, and you don't care. That's more like how it was.” 
― Jane SmileyA Thousand Acres


I cannot be the first chairmaker to think of this. Simply can't. But anyway. Stretchers. 


Like I was taught, a couple rubber bands, measure the distance, add a 1/4" and there ya go. Assuming you measured right. Assuming the stretchers bulbs are 1 3/4". assuming you drilled exactly 1" etc.  Any addition of assumption leads to mistake.   So I use a two step process.

I first get a rough ( but really pretty accurate idea ) of the length using rubber bands.  Say the measure is 17 1/4". I then turn the stretcher say 17 3/4". Or 18". Really a ballpark shot.


Then I use two dowels placed in the already drilled holes and mark where they intersect.  A quick measure and vi-o-la. The exact length that the stretcher needs to be. Like I said I can not be the first to think of this, but it does work for me.  I then cut the stretcher to length, and assemble.


Wednesday, September 4, 2013

Chair Seat


Experience is simply the name we give our mistakes.
Oscar Wilde


 Used to be I would leave the sightlines and the different scribblings that comprise a chair on the bottom.  Never really gave it much thought. No one ever saw it and it wasn't painted so what's the big deal.  But lately, not really sure why, but this struck me as something of a short cut...lazy maybe.  So I have been planing the bottoms just before assembly.

Also I now use a clean rag when I wipe the finish on the bottom of the seat.  What happens is by the time you get around to wiping the oil the milk paint has been sanded three or more times, so a lot of color gets transferred to the seat in the oil.  I know this is being very persnickety but it bugs me.  I like to flip the chair over and see a bright, clean surface.


Here are some different shots of a seat I recently made for a rocker.  I actually timed myself and came in at just over an hour, not bad.


This is a nice curl of end grain.  The above drawknife is made by, I think, Ray Larson. I takes a wicked edge but due to the very low angle is really only good for pine and butternut.  But even so, a small price to pay for a tool that cuts like this one. 


And believe it or not this girl starts 3rd grade tomorrow...tempus fugit.  


Sunday, July 21, 2013

Lining Up Posts


A divorce is like an amputation: you survive it, but there's less of you

Margaret Atwood


I knew it had been awhile since I had last posted and but April 17? Wow. See above quote.   Anyway, I have a student coming tomorrow and it's high time to get back at it. 


This post is about how I line up and ream the arm posts.  I'm sure there are other ways but this is how I do it.  If you've followed this blog at all you know I use sightlines and a square and a reamer from Elia Bizzari to obtain a 6 degree hole. Just be careful not to over-ream and all is good.   But in order to get the ends to land at exactly the same place, I use winding sticks.


You can see here the side view. These arms are spot on.  And the process is dead simple.  I use the back of a yardstick painted green and a length of aluminum angle.  The yard stick butts against the back of the posts and the aluminum angle rests over the ends of the arms.  Then just sight down and you can see how the posts relate to each other.


This one is pretty much spot on.   One caveat...this does not show you slope ( the angle left and right relative to the seat ) so be careful not to get tunnel vision. In other words, keep checking the reamer tip against the square.  But this is a eazy-peezy way to have both the post land at exactly the same spot.

Below you can see my fancy winding sticks.  I also use this same method when reaming the back posts on my rockers.  Works great there too because the angle is really irrelevant ( within reason). Symmetry is much more important.

For those of you who merely read my blog for the literary wit, winding sticks ( like wind up for a pitch ) are use to flatten wood and show relations across distances.  Think of it this way...if you had a black stick and a white stick, both strait and flat.  And you placed them at either end of a table that was also flat. And you peered ( sited) from end to end across the table you would see a white line and a black line parallel to each other.  This would tell you that the table was flat.  Now imagine one end of one stick you placed three quarters under. When you sighed down the table, the sticks would be "out of wind".  Now imagine that there were no quarters but the sticks were not parallel.  This would tell you that the table was not flat. 


Tuesday, June 12, 2012

Good set of oars


" At sea, I learned how little a person needs, not how much. "  

Robin Lee Graham


I decided early on that for my boat I wanted to build my oars.  The book I am using to build the boat, "Heidi- a 12' skiff for Sail and Oar" by Rich Kolin, has a great chapter on building them so I had at it.
Above you can see the octagon layed out to form what will eventually be a round, 8, 16, 32 and then round,  just like the spindles on my chairs.


Above you can see the neat little gauge, a spar gauge, used to lay out the lines.  It traces two lines regardless if the pieces taper or not.


Not sure if you can see it but this piece of spruce had some birds-eye in it.


Octagon layed out and planed.  I had planned to use a draw knife more but the grain was funky so I used a spokeshave instead.  Change of tact, you might say.


Rounded off with a spokeshave followed by paper.


I recently made a new shave horse (next post) so students wouldn't have to share.  I also made it a different style so they could try both to give them a better idea of the styles.  This style does much better at holding long pieces, like oars or the back of a settee I'm building for a client.


Here are all the tool used for the oars, save the bandsaw and paper.


I really like this Stanley block plane.  The mouth really opens up and it has a Hock blade, the best blades on the market in my opinion.


Here is the blade and tip.  I am really looking forward to using them soon.  All that's left on the boat is the outside paint.  But I have been really busy with chairs and classes and life, but in the water by the 4th..."second star to the left and straight on 'til dawn"


Friday, January 20, 2012

Like New Disston 115 for sale

First and foremost arms are tools in the service of rival nations, pointing at the possibility of a future war.
Alva Myrdal


After much thought,  have decided to sell this Disston D115 panel saw.  This saw is pretty much perfect...the handle is beautiful rosewood.  According to Pete Taren at Vintage Saw, this is the best saw that Disston made. 

It can be found at ebay here.


I have been buying and fixing up old saws.  Maybe I'm just weird but I really do enjoy fixing these up.  I find filing them meditative, weird I know.  Such a simple tool, a handle and some spring steel.

Thursday, November 17, 2011

Home-Made Scrub Plane ( sort of )


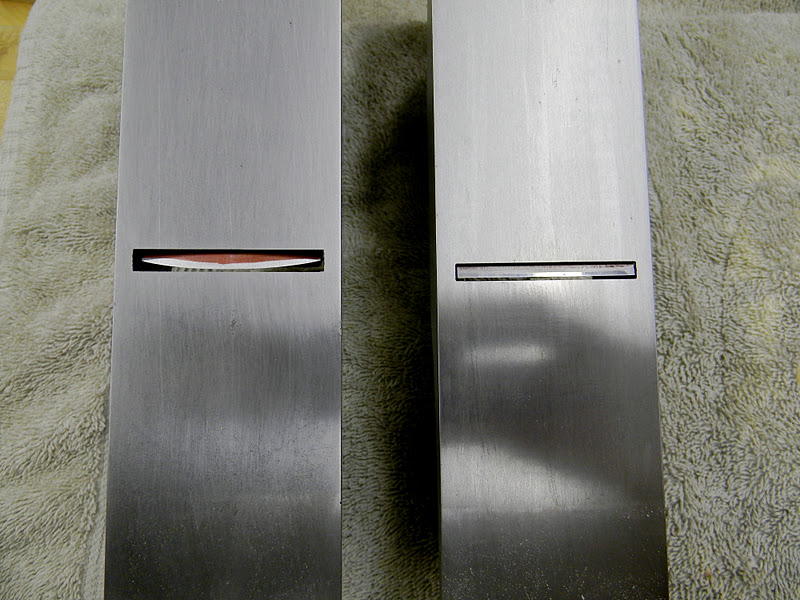
 Here you can see a standard store bought scrub plane.  This one is a Lie-Nielsen and it is a very nice plane.  Since buying it a few years ago, I have discovered a few things.  First off, this style of scrub plane is basically French in origin, or at least continental.  It doesn't have a frog or blade adjuster, which is fine.  It has a big wide open mouth, which is good so you can take think shavings and get the job done.  This plane is made to quickly flatten a board, think of it like a  hand powered jointer.  But there is one problem, it is too short to really flatten a whole board.  I think it works better in trouble areas--like a hump or a twisted board that has localized areas that need to be whacked down.

But given that it is so short, it will follow the board, rather than cut the high spots which leads to all the humps being leveled, and thus the board gets flat.  This plane does not take fine shavings or leave a fine finish.  As a matter of fact, the plane is used diagonally across the grain, so there is gonna be a fair bit of tearout.  But this will be cleaned up by the next plane, the jack plane (or better yet a jointer plane).  And finally a smoothing plane, but I'm getting ahead of myself.


Here you can see the Lie-Nielsen scrub next to a regular jack plane ( No. 5).   You can see the difference in length.  The scrub is about 10 inches and the jack is about 15 or so.  This may not sound like much but it is.  This extra length allow you to end up with a much flatter board.  But if you want to
quickly flatten a board, you need to make the blade more curved, a lot more curved.


 Above and below I'm getting ready to grind the curve, about an 8" radius.  Just set a compass to 8" and scribe am arc on the blade with a sharpie.  And then eyeball the angle and swing the blade back a forth, trying as best  you can to maintain a constant center.  I thought I had a jig for this bit I couldn't find it.  At any rate, just swing back and forth.  Be sure to mark the bevel with a sharpie so you can keep track of your progress.


You can see below how critical the marker is...getting close here.  Of course the middle will be the last to be done. 


 Above you can see I'm about there, and on the right it's done.  You don't need to grind right to the edge, the stones or in this case strip sander will finish it up.  Actually there is a school of thought that you should never grind right to the edge, always stop short as the temp at the edge, because it is so thin, can rapidly get hot enough to take the temper out.

 Above you can see a great way to cool a blade, simply set it on the support for my strip sander.  The aluminum quickly pulls the heat out with worrying about quenching problems.  This really does work.

I sharpen the blade on the strip sander with a fairly rough grit.  I don't really go nuts on sharpening a scrub plane blade.  This tool is not intended to take fine shavings, so save your time and get it quick sharp. 


 Again, hold the center point and swing the blade back and forth, trying to keep it steady. 


This sander works great for sharpening kitchen knives too.  I do it free hand and run the burr off by using the inside of the belt.  I always amazes me peoples tolerance for dull knives.  It seems that if the knife is only slightly sharper than a butter knife, it's ok, but I digress.


 Here is how I set the blade in the mouth.  You want a fair bit of blade sticking out.  Time for a little honesty...the radius on this blade is about 5", which really is too quick a curve.  I didn't measure it and after using the plane, I will have to regrind the blade.  But the theory is the same.  I never measure the thickness of shaving, but you want a pretty thick shaving coming out.  Back the frog right off and open the mouth right up.


Here you can see the difference between the jointer plane on the right and the shop made scrub plane on the left.  The scrub is used first to quickly flatten the board, diagonally corner to corner, and then the other way, and once it's flat, come back with the jointer plane and get it really flat, and clean up most tearout.  You can pick up a decent No. 5 jack plane pretty cheap and grind the blade to about an 8" radius and you have yourself a scrub plane.  This doesn't have to be a really nice plane, or even that flat.  If you want to spend time tuning a plane, do it to the jointer plane and the smoother, but those are other posts.  I honestly use a power jointer to flatten my boards, but if I get a plank that is too wide for my jointer, it's nice to have this ability so you can have a wide table top or bench seat without having to rip it apart and glue it back up.

On the home front, I broke my thumb splitting out some firewood (sledge hammer 1, thumb 0 ) so it looks like small projects for awhile, after Thanksgiving anyway.