Showing posts with label Tools. Show all posts

Sunday, November 18, 2018

Ax


He hoped it would snow recklessly and bring to the island the impossible winter purity; so rare and precious, he remembered fondly from his youth.

David Guterson, Snow Falling On Cedars 


I don't use an ax everyday in my shop. I do use a small hatchet, actually it's a shingle hatchet. But I did want to have a decent ax so I bought this one.  It's has very good balance and heft.


Here you can see what I use to sharpen my axes. I don't use stones; instead I prefer using a Nicholson single cut bastard file. I don't use stones because lately I've become keenly aware that I spent a lot of time over sharpening things.  I also find that things like draw knives and axes can really wear out stones and thus I have to spend a lot of time flattening the stones.  


I also wanted a nice sheath for the ax so I got some leather and used some paper to make a pattern and then cut the leather and riveted it together. A small strap holds it on.  I also put some snow seal wax to deepen the color and protect it from the elements. 


  I also put some snow seal wax to deepen the color and protect it from the elements. 


Saturday, October 20, 2018

Fall


I think the best thing I've written is a story called 'The Boxer and the Blonde.' It's a piece about Billy Conn, the white would-be heavyweight champion of the world, who lived in Pittsburgh. 

Frank Deford


I'm reading a book by Frank Deford, Everybody's All American and I can't recommend it enough. DeFord is a brilliant author, and while he is best known as a sportswriter, his fiction is amazing.


Just a few pictures of fall in mid coast Maine. 


Progress on the shop continues, as time allows. We did get one wall up today, hopefully the rest tomorrow. 


It's a post and beam construction so it should go up fairly quickly..


Tuesday, October 2, 2018

Chopping Block


Aim for the chopping block. If you aim for the wood, you will have nothing. Aim past the wood, aim through the wood; aim for the chopping block.

Annie Dillard, Pilgrim at Tinker Creek


I recently picked up a felling ax at an antique shop and rehabbed it ( I'll do a post on that soon ) but here it is all fixed up.  The red handle serves no purpose but it does look sharp.


The shop pushed too close to a stand of maples and they had to come down. Despite their small size, there is enough clear maple for a few chair legs.


Sunday, October 9, 2016

So this happened

Here's an interview the Bangor Daily did about me. I tried to talk about not only chairs but also the nature of art and craftsmanship. 
https://m.facebook.com/story.php?story_fbid=1103360949739817&id=100001977660888

Friday, September 9, 2016

Seat


There are chapters in life that are never talked about, and certainly not aloud

Carol Shields, The Orange Fish


So long hiatus. Maybe someday I'll read that chapter aloud.  Just a few random pics of seat carving. It took me along time to learn how to turn, for some reason, then one day I realized I was. But for whatever reason carving seats came very quickly and easily. Some things in life come easily, some are hard. Usually the hard is worth it.


Wednesday, March 2, 2016

Spindles


He sat for a long time. When he climbed back up the ridge to the cedars to where he'd left the horses the captain was sitting on the ground and he looked badly used up. 
Let's go, he said
The captain looked up. I can go no further, he said.
Let's go, he said. Podemos descansar un poco mas adelente. Vamonos.


Cormac McCarthy, All the Pretty Horses


Making spindles. Lots and lots of spindles for a bench going to Alaska. The bench is is going to be a clear finish so I have to be extra careful about picking only sap wood ash and nice strait grain.  Luckily the ash log is absolutely beautiful (pics soon).


I did take a minute to replace the maple wear strip on my spoke shave. You can see how much wear it was gotten over the years ( this is number 6 I believe). I could use a brass plate easily enough but I actually like the groove that develops. I centers the spoke shave and allows for shallower cuts to the left or right.


Here you can see clearly the arrises of the octagonals that form the spindle. When I'm at this step I kill the overhead lights and use a single incandescent bulb in a stand. This casts a raking light that allows me to easily see the eight facets of the spindle. Only 28 more to go.


Friday, August 15, 2014

Leveling a Rocker


I leave off, for I seek to hold the wind in a net

Sir Thomas Wyatt


This is a bench I built awhile back, sold to a professor and Harvard Medical School. Really have to build another one...the next one will be Tavern Green. I think. Anyway, this post will be about leveling a rocker side to side.


Unlike regular chairs, in which you level it left to right then measure the seat front and seat back, then trim the legs, rockers are, or rather can be, much harder to level.  Because the slot is cut with a router, the only real way to level the rocker left to right is to chop the bottom of the slot deeper with a chisel. This I have found is a tedious process.


So the last rocker, or one rocker anyway, I had a great idea.  What if I measured the leg length relative to the seat AFTER the legs were reamed and set in the chair.  That way, the shortest one, the shortest leg would become the baseline leg and the other legs could then be trimmed to this length on the lathe, and then the slots cut with a router.  Let me back up. The legs are trimmed in pairs, front to front, back to back.


So here you can see the difference in leg lengths after reaming and placing the legs in the seat. By using dividers, my large ones, I simply find the length of the shorter leg and then mark the longer one.


Then I turn the leg to length on the lathe with a parting tool, and viola the legs are all the same length. Well, the front two match and the back two match.  This means that once the rockers are placed in the slots, the chair will automatically be level left to right.  Ez-pz.  Below you can see the difference on the length.  Not a huge difference but enough to be a pain leveling, especially with maple as in this chair.


Tuesday, January 7, 2014


Happiness often sneaks in through a door you didn't know you'd left open

John Barrymore


Well the holidays are done and now the business of winter is in full swing.  But much solace can be be taken from these two beautiful happy faces. It is a period of change so Elsa and Anna were happy to have a joyous Christmas.


And now to chairs. I love dividers. There I said it.  These two beauts are from Starrett...a 6" and 12" respectively. One thing I love about chair making is you are always learning something new. Sometimes it's something big, sometimes its a small tweak to a method that makes a small but nonetheless significant difference. And know that when I say a significant difference I really mean it made something easier.


And so today I came up with a wizz-banger. I've always loathed leveling a rocker. A non rocker is easy. Wedges, trace the difference, cut, done.  But rockers have routed slots and therefore the slots have to be traced and chopped which is a major pain. The problem lies in the inconsistency of reaming. Some legs simply get reamed too much despite my best efforts.


SO today I thought why not check the length of the legs AFTER they are reamed and seated. So I checked them with my handy dandy 12" divider and viola they were off as you can see below. Now admittedly it's not much but try chopping out end grain hard maple and you'll fast appreciate this small difference.


I marked out the difference and I was a simple matter to turn to the new length. I turn the legs to length anyway so a different mark is no big deal.


The pics above and below show the small difference. The one above ( these are both back legs. Do not compare front to back...only front to front, back to back ) the shortest leg is the base line and the longer one, below, is turned shorter.  I have yet to install the rockers but this does make a difference in the final balancing of the chair.


Sunday, September 15, 2013

Hints for Turning


I only that summer sang in me a little while,
that sings in me no more

Edna St. Vincent Millay


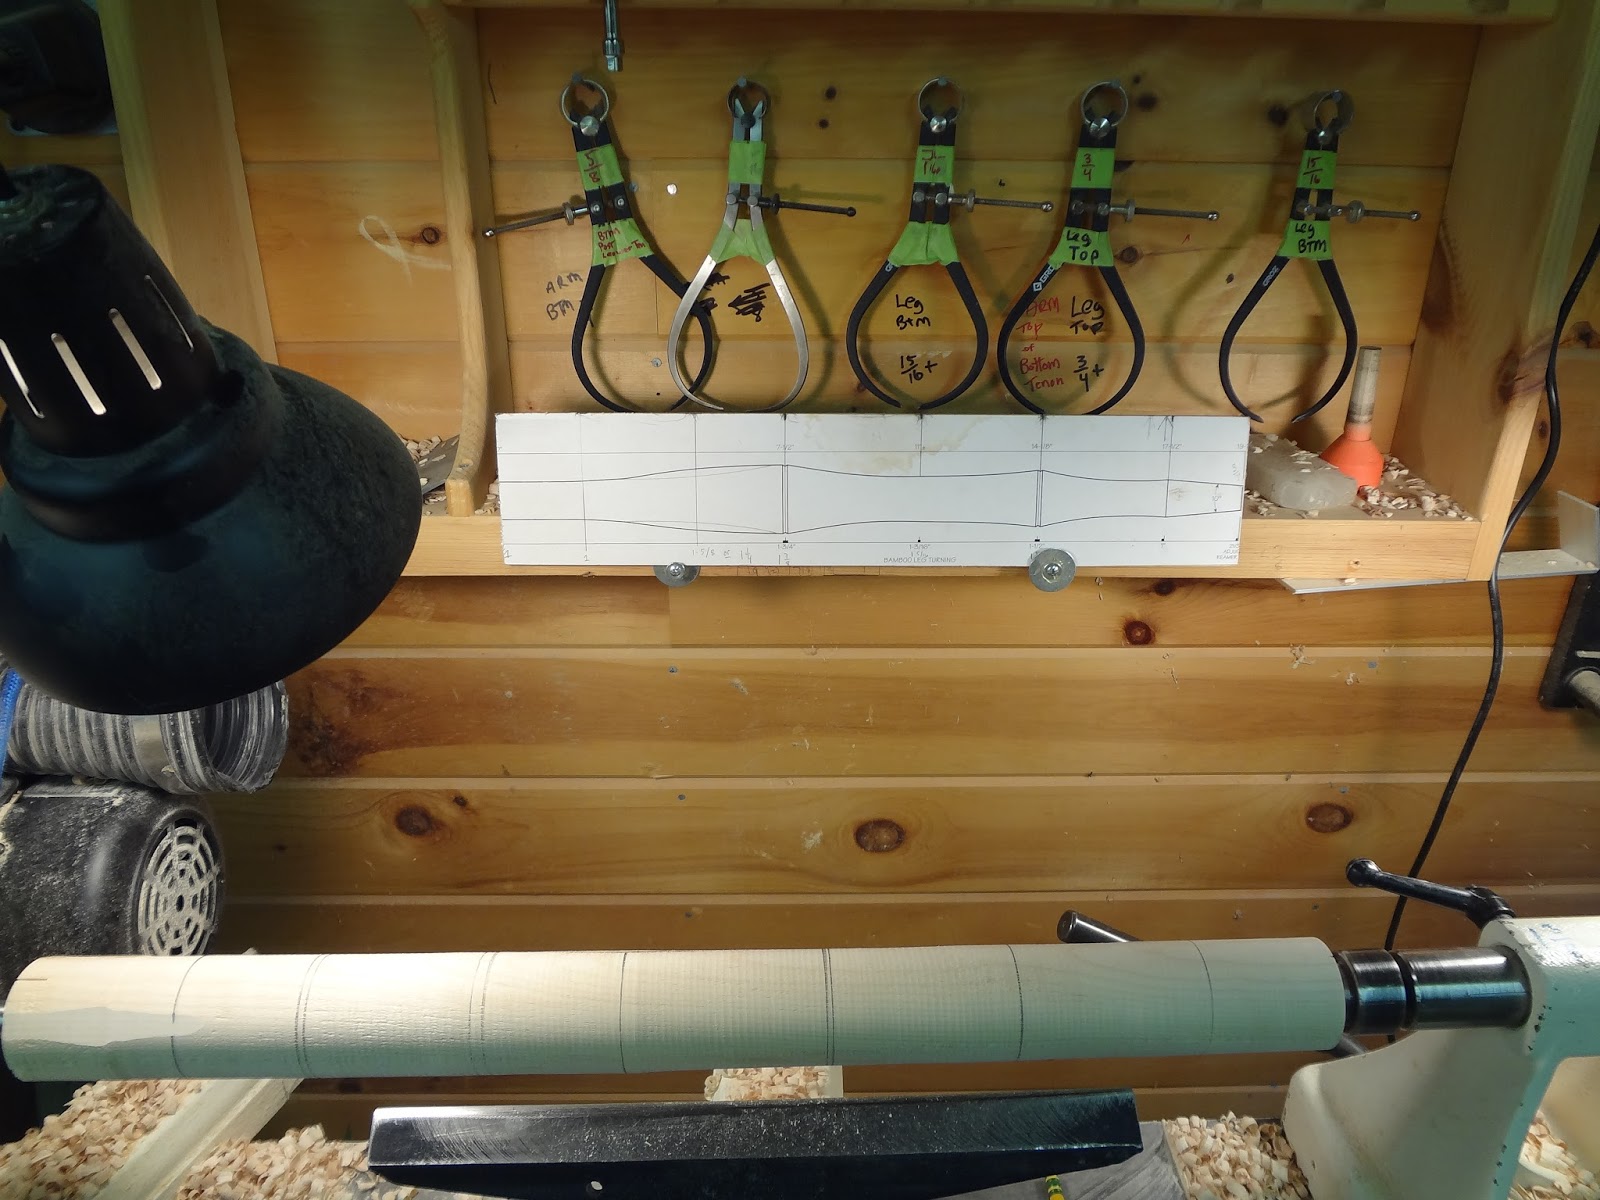
Above you can see the basic set-up I use for turning.  Nothing really special here but I do want to mention a few things that have helped me out.  First off I print or draw the pattern onto the a piece of thin plywood or wood and clearly mark all major and minor dimensions onto that.  That way they are clearly and consistently transferred to the piece.  No fiddling with a tape measure or piece of paper.


As to the major/minor dimensions.  I define major dimensions as "outside" dimensions, like the outside node of a bamboo turning, or the dimension of a tenon.  These are finite dimensions and are carefully measured with calipers.  Further, these are denoted with with one pencil line.  The "minor" dimensions represent, in this instance, the hollow between the nodes of this turning.  These are also measured and cut with a parting tool as well, but when I come to actually turn them, as long as it looks good and flows it's fine. I denote these with two lines.  This is all pretty obvious stuff but it really does help with consistency. 


This next step was a major step forward for me.  I used to struggle with vibration, even on big pieces.  And while it was very obvious now, I used to simply place the blank on the lathe and use the tail stock to force the drive center into the piece.  Which of course put a lot of pressure on the ends and as the middle was cut away, vibration resulted.

Now I either hammer the drive center into the end or if the blank is square I make diagonal cuts on the drive end that the drive center can bite into, and then as I'm turning the piece I can back the pressure of the tail stock and reduce the chance of vibration.


Above is a view of the a bamboo turning that shows what I mean by major and minor measures.   The hills are the major dimensions and and the valleys are the minor ones.


This is a shot of the calipers I use.  I used to only have a couple and I would measure each dimension and transfer to the piece.  And I can tell you if you want a slow, inconsistent way to do it that's one.  I also use a Galbert Caliper which works great.  But for really precise measures I prefer calipers.  You can't tell but I actually froze the thumb nuts with some super glue so they would not get out of whack.

Like I said, just a couple hints that have helped me out.   Now off to pick blueberries with the kids!