Showing posts with label Turning. Show all posts

Friday, November 2, 2018

Old Pictures


She glances at the photo, and the pilot light of memory flickers in her eyes. 

Frank Deford, Everyone's All American


So in the process of sprucing up my blog, I've been looking thru a lot of old pictures and these are some random ones that caught my eye.  It's been a long trip with lots of ups and downs. Yeah. Long trip so far.


Mr Dog...Forrest


Huge moose me and the girls saw coming back from daycare. Not 2 miles from my house in Presque Isle.


A couple Philadelphia Rockers and a contemporary rocker in yellow. Think I painted the contemporary rocker final coat black milk paint mixed with green...which would explain the yellow.


Top view of my Contemporary rocker


Back view of my Rod Back Contemporary rocker


Fan Back arm post showing how they are all wedged. White glue. Before I discovered hide glue


Rod back arm chair I built for my father. This chair was chosen out of a field of 12 to reside at The Connecticut Museum in Hartford. I told my dad about it and he asked, did they pay you for it? 


Sack Back, shadows


Corner of a cherry dresser I built for my daughter. Gorgeous cherry color. If you look closely you can see the divider is dovetailed in to the side of the carcass.


Sack Back bench I built for my old neighbor. If memory serves this is the first piece I used my own turnings on...vase and tulip turnings. Beautiful;l cherry seat.  Maple turnings and white ash spindles and arm and crest.  The legs don't have much splay...not sure why.  Oh I remember...it was going in a tight space a transition between the foyer and kitchen. 


A gorgeous hand smithed hold down from Alaska. He doesn't make them anymore.  

Sunday, October 9, 2016

So this happened

Here's an interview the Bangor Daily did about me. I tried to talk about not only chairs but also the nature of art and craftsmanship. 
https://m.facebook.com/story.php?story_fbid=1103360949739817&id=100001977660888

Friday, August 15, 2014

Leveling a Rocker


I leave off, for I seek to hold the wind in a net

Sir Thomas Wyatt


This is a bench I built awhile back, sold to a professor and Harvard Medical School. Really have to build another one...the next one will be Tavern Green. I think. Anyway, this post will be about leveling a rocker side to side.


Unlike regular chairs, in which you level it left to right then measure the seat front and seat back, then trim the legs, rockers are, or rather can be, much harder to level.  Because the slot is cut with a router, the only real way to level the rocker left to right is to chop the bottom of the slot deeper with a chisel. This I have found is a tedious process.


So the last rocker, or one rocker anyway, I had a great idea.  What if I measured the leg length relative to the seat AFTER the legs were reamed and set in the chair.  That way, the shortest one, the shortest leg would become the baseline leg and the other legs could then be trimmed to this length on the lathe, and then the slots cut with a router.  Let me back up. The legs are trimmed in pairs, front to front, back to back.


So here you can see the difference in leg lengths after reaming and placing the legs in the seat. By using dividers, my large ones, I simply find the length of the shorter leg and then mark the longer one.


Then I turn the leg to length on the lathe with a parting tool, and viola the legs are all the same length. Well, the front two match and the back two match.  This means that once the rockers are placed in the slots, the chair will automatically be level left to right.  Ez-pz.  Below you can see the difference on the length.  Not a huge difference but enough to be a pain leveling, especially with maple as in this chair.


Thursday, November 7, 2013

Student Chair


"Ishmael gave himself to the writing of it, and as he did so he understood this, too-that accident ruled every corner of the universe exceptt he chambers of the human heart."

David Guterson, Snow Falling on Cedars


Iv'e recently been building some rod back side chairs. I like the fact that the lower and upper turnings are basically the same...thin pieces that stylistically are very similar. But thin is the rub. Because they are very whippy and frankly and a pain in the ass to turn.  I guess part company with some builders in that I have no problem using a steady rest.  Guess I'm not a purist, or a Protestant.  One thing that does help a lot  is having two tool rests.  Before I would turn the left portion and then I'd have to disassemble the whole thing (tail stock, steady rest etc ) in order to move the rest to the left part.

After a big bench order I said enough of that and ordered an additional rest base.  I want to call it a banjo but I'm not sure that's right.  I like rodback spindles turned.  I built a big bench years ago and I shaved the spindles and I still don't like it. That's me.  I also like Tabasco and ketchup on my scrambled eggs.


Above you can see a rust eraser ( I think I got this from Lie-Nielsen ) and I use this thing all the time to buff up the tool rest.  I also use it to buff the part of the tool that contacts the rest.  I seem to get this weird black stuff that makes the tool sticky.


Below you can see Mark my latest student.  He picked a difficult chair, a Philly Comb Back Rocker and pulled it off swimmingly. He picked up the turning right off the bat and we had a great week.  One thing Mark allowed me to do was see how random I can sometimes be.  That is to say I know what the various processes and sizes need to be, but seeing the whole process thru a students eyes allowed me to see where confusion lies.  So after the class I spent better part of two days just organizing and labeling.  This has in turn helped me so thanks Mark.


And here's Mark and his chair. As I said he picked a very difficult chair and did a great job.


Sunday, September 15, 2013

Hints for Turning


I only that summer sang in me a little while,
that sings in me no more

Edna St. Vincent Millay


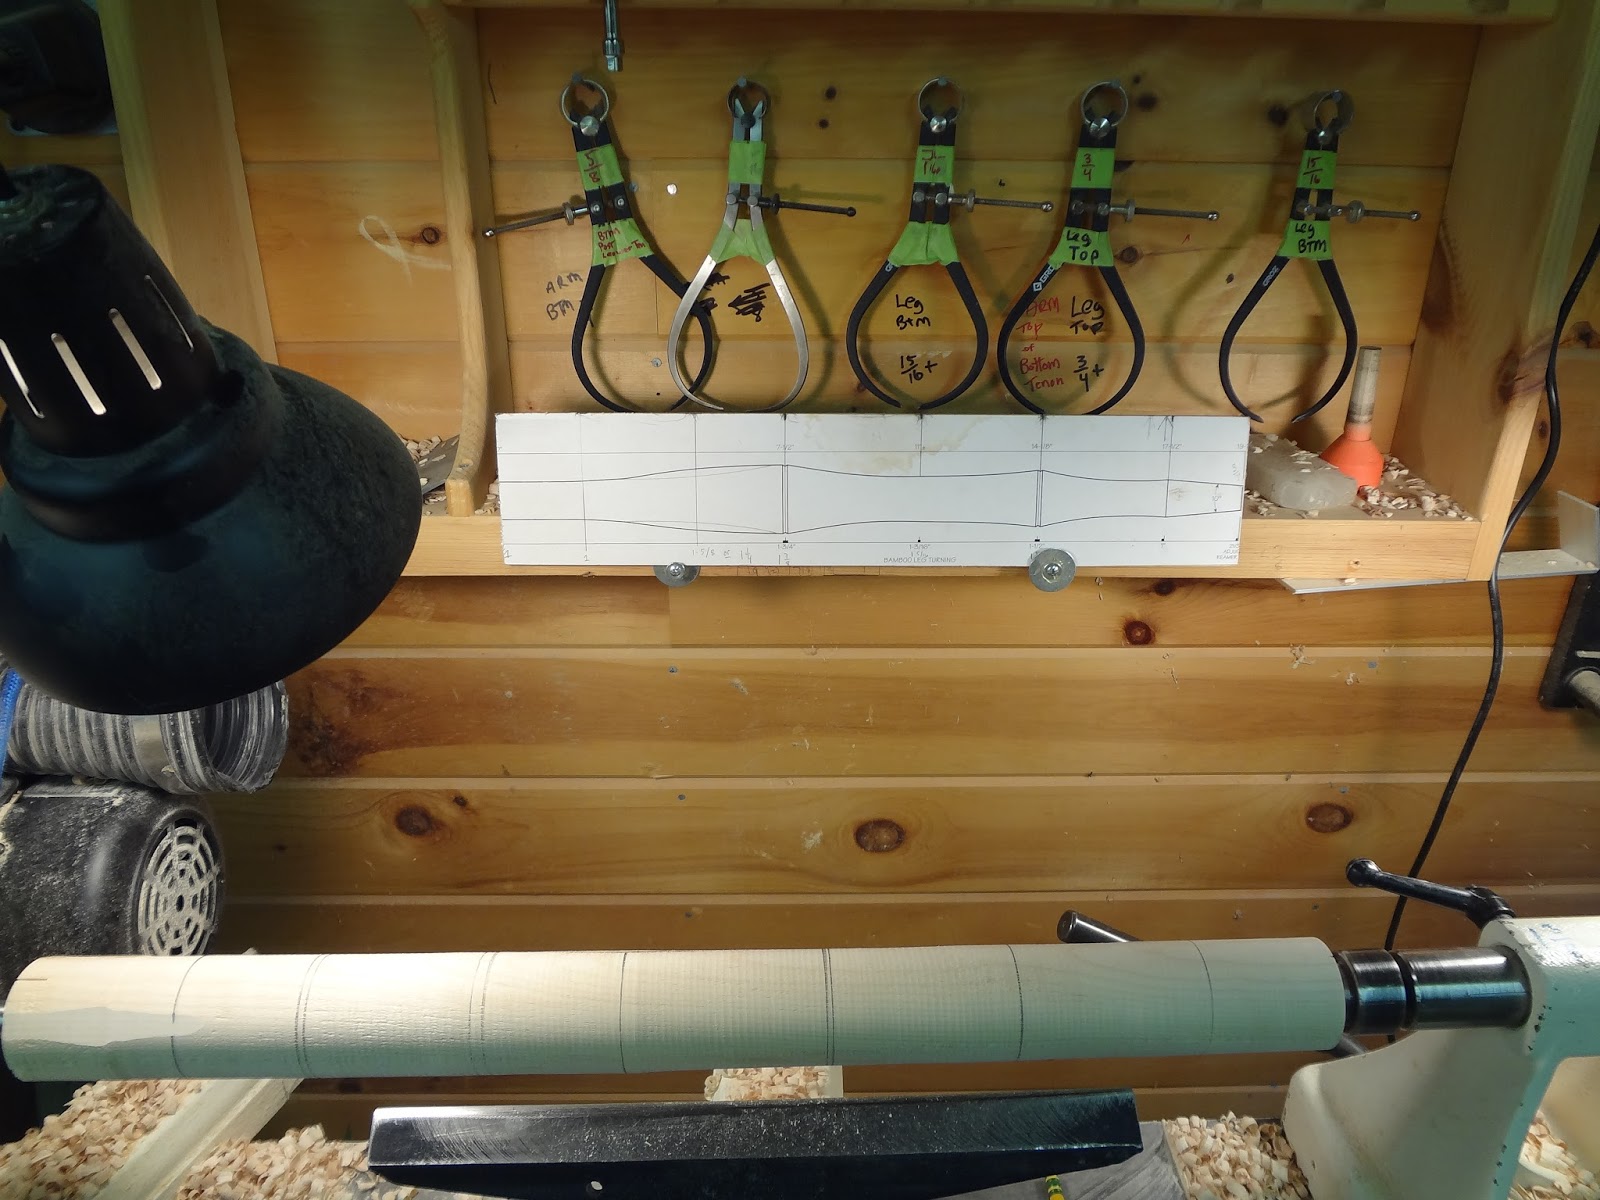
Above you can see the basic set-up I use for turning.  Nothing really special here but I do want to mention a few things that have helped me out.  First off I print or draw the pattern onto the a piece of thin plywood or wood and clearly mark all major and minor dimensions onto that.  That way they are clearly and consistently transferred to the piece.  No fiddling with a tape measure or piece of paper.


As to the major/minor dimensions.  I define major dimensions as "outside" dimensions, like the outside node of a bamboo turning, or the dimension of a tenon.  These are finite dimensions and are carefully measured with calipers.  Further, these are denoted with with one pencil line.  The "minor" dimensions represent, in this instance, the hollow between the nodes of this turning.  These are also measured and cut with a parting tool as well, but when I come to actually turn them, as long as it looks good and flows it's fine. I denote these with two lines.  This is all pretty obvious stuff but it really does help with consistency. 


This next step was a major step forward for me.  I used to struggle with vibration, even on big pieces.  And while it was very obvious now, I used to simply place the blank on the lathe and use the tail stock to force the drive center into the piece.  Which of course put a lot of pressure on the ends and as the middle was cut away, vibration resulted.

Now I either hammer the drive center into the end or if the blank is square I make diagonal cuts on the drive end that the drive center can bite into, and then as I'm turning the piece I can back the pressure of the tail stock and reduce the chance of vibration.


Above is a view of the a bamboo turning that shows what I mean by major and minor measures.   The hills are the major dimensions and and the valleys are the minor ones.


This is a shot of the calipers I use.  I used to only have a couple and I would measure each dimension and transfer to the piece.  And I can tell you if you want a slow, inconsistent way to do it that's one.  I also use a Galbert Caliper which works great.  But for really precise measures I prefer calipers.  You can't tell but I actually froze the thumb nuts with some super glue so they would not get out of whack.

Like I said, just a couple hints that have helped me out.   Now off to pick blueberries with the kids!


Sunday, April 21, 2013

A Different Way to Bend


"There's no room in here!"

Wayne Burby


The quote is from a great old guy I used to work with who was always griping at the mill that there wasn't any room.  He was a funny, sweet guy and honestly he was right; often times there wasn't enough room.  His saying has sorta turned into my own joke when I find myself tripping over stuff or looking for too long for things that I JUST PUT RIGHT THERE!!!

I recently went on a cleaning spree and tossed pieces of wood and took stuff to the salvation army in order to have a common area where all my patterns, papers and forms can go in a somewhat logical way. 

The picture above shows a bench I'm building for a client and while I have wanted to build this for awhile, the prospect of 14 bending forms and the subsequent 28 clamps was a bit much, but the book also had this board that had holes drilled in and pegs, sorta like my own little Plinko board. 


Here's a better shot below.  The turned and steamed pieces, Maple in this case, are threaded thru the pegs and thus held in the right bend for a few day in the kiln, then taken out done.  The best part is the they can be stacked two high, seven wide so I can do all 14 on this one 2x16x 20 piece!


And here's the first one steamed and bent.  The thin piece of wood prevent denting.  I finish turned the tenons top and bottom before steaming and while I seriously doubt the sizes to hold, it would sure be nice if they did.  I turn my tenons on the lathe but once they are bent I can't so I'd have to size them by hand.  Not a huge deal but much faster on the lathe.


Another thing I've recently tried and it works is doubling the slats for my rockers and then doubling them again between the clamps.  I used to do these one at a time, and man dragging those clamps around was a pain.  But now I can do four with just two clamps.  The Irwin clamp pulls the middle together, and the K-bodies finish the clamp and hold it in place.  So for one chair I went from seven forms and 14 clamps to 4 forms and 4 clamps. 

Sadly Wayne isn't around anymore, but I did laugh to myself thinking of Wayne and his comments about room.  I think he would approve.


Tuesday, October 16, 2012

Fall Clean Up


He piled upon the whale's white hump the sum of all the general rage and hate felt by his whole race from Adam down; and then, as if his chest had been a mortar, he burst his hot heart's shell upon it.

Herman Melville, Moby Dick


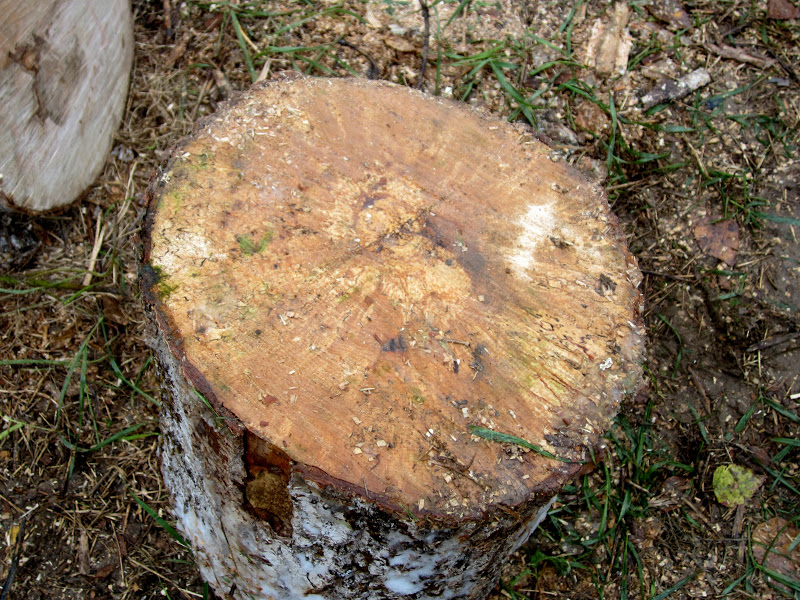
Every year, come fall, I end up with a few logs, ash and maple, that have been around for awhile and something has to be done.  So this last Sunday I decided to was the day.  Some of the logs are in pretty good shape, like this one below.  The cut looks fine, no visible rot at all.  One cool thing you can see to the left center is the head of an ingrown knot, a fist sized ball of bark that deforms a large portion of the log.


Below you can see obvious rot, usually the end of the logs.  It's fine for firewood, and splits pretty well, but is still hard work.  It really makes you realize how hard a life people lived 100 years ago, before wood splitters and chainsaws.


The white ash log below is beautiful...exactly what I am looking for... a centered heart on both ends, wide growth rings, no visible whorls or ingrown branches.  A perfect log.  One problem with ash is that it has a very low initial moisture content, so after sitting around for awhile it dries out and gets hard to work with a draw knife.  It used to fight thru but now I just turn it into firewood.


These are a few brown ash trees that I cut for a chair that never panned out.  The logs are fine, and I cut them off my land, so I'm gonna take a chance on these ones.


And here is the result.  The pieces on the tailgate are gonna be turned (literally) into legs and the rest is firewood.  Not a bad haul...now I have to go get a few more ash and maple logs to get thru the winter.  There is plenty of maple around, but the ash is a little harder to find. 


Stacked and ready for winter.


A beautiful Sugar Maple on my land, same tree I use for the legs.


Sunday, March 11, 2012

Big Slick

If not for the sea, we would have to carry our boats about.

Norwegian saying


For those who have followed my blog for awhile, you have seen this boat before.  I started it a couple years ago, and after a brief, well, a year long break, I am getting back into the boat shop ( garage) to finish it up this summer, come hell or high water.  When I was building it, I wanted to have a big slick but 1. I wasn't really sure how much I'd use one and 2. they are pretty spendy on Ebay, so when I saw an article on building one, I decided to.


The article called for a blade made from a leaf spring, so I got one from a friend and cut to length and then drilled and tapped the holes.  I've had a fair bit of experience tapping metal when I used to weld, but tapping this was tricky.  The steel is hard, not super hard but harder than most metals, so you have to drill a bigger hole and use lots of oil.  Even so, I broke one tap.  Below you can see the size of the tool.


The blade is held in place by screws, so I guess you could change out the blade to a straight one for timber framing work, but for my purposes, the sweep on the leaf spring works great because it clears the handle and allows  me to pare easily.


Here you can see how much sweep it has.


 I have yet to harden the blade,  but I am thinking at about 25ยบ on the primary bevel will be about right.  Despite it's impressive size, it's a paring tool...the knob end rests in your shoulder and you push with whole body.  The handle is white ash but about any hardwood would work.  After syrup is over, I'm getting the boat back out, maybe three more weeks. 
 I am really looking forward to getting the boat in the water, should be a lot of fun.  I've read that the time spent in a boat is inversely proportional to the size of the boat...I hope this one is the perfect size.