Sunday, December 4, 2011

A Few Neat Tricks


 I found this the other day on the Internet.  Not the empty potato chip container, a thread on how to sharpen rasps and files.  I use these a lot when I carve the knuckles on my chairs and over time they get dull.  I suspect they actually get clogged with shavings, but cleaning them is next to impossible.   I found this about using battery acid for 5 to 10 minutes and being very careful, all that.  But then I found one that said you could use vinegar overnight and it would do the same thing, and was a lot less risky.  So I filled a container with vinegar, left overnight, and it really did make a difference.


Here you can see the bubbles as the wood jammed into the crevices is eaten away.  This is actually a regular double cut file.  These files are pretty easy to clean with a card file, a small stiff brush.  This file was really dull, so it was a good test for this.


 I cleaned the file and rasps the next day with a stiff brush and baking soda, which neutralizes the acid and provides a bit of grit to clean the file or rasp.  Then I dried them with a heat gun and checked them to see if it made any difference.  With the rasps, they felt sharper but it's hard to tell if they are truly sharper or if they are just cleaner.  Either way they cut better, but I have a hunch that they are sharper, that the acid eats away the dull edge and leave a sharper edge.  But on the file, which was free of debris going in, it really is sharper.  It cuts better and faster, so I guess the process works.


 Here are a couple shots of the files and rasps I use to carve knuckles.  Nicholson #49 and #50, and a cheap one I think from Lee Valley, which actually works really well.  And the file I finish the surfaces with.  I do wish I could carve better, but until that day comes, I use rasps and files. 


 You can see here they are cleaner.  I was gonna order new rasps, that's how slowly these were cutting, but a simple ( and cheap ) fix and they are good as new.  Saves money and resources, which is also good.  One thing I do want to note is when you buy a file, try to find one with a safe edge (no cutting teeth on the edges), that way you can finish right up to an adjacent surface without marring it.  You can see that the rasp below does not have safe edges.


This is where this all leads.  Some people are better at carving and don't have to use rasps and files and I envy they're ability.  But these tools get me where I want to go, so I will continue.  I also think that some look down their noses at this technique, which is fine.  More power to them. 


And in the spirit of recycling, here are a couple pics of a small piece trimmed off a leg I was turning.  I split the pieces from a dead green log, split and then turn the rough pieces in to 2 1/4" rounds, then I let them dry for a few days and then turn them.  Anyway, one problem is end checking.  Usually this isn't a big deal, but by painting the ends with old shellac, the ends don't check at all.  Anchorseal works great too, but then I gotta order it, and pay for shipping   The shellac I had laying around anyway, so again, I save money and resources.  And the shellac works great.  I get the shellac based primer, Zinser.  Plus, when you get Anchorseal on a smooth concrete floor, it's a whole different kind of slippery.  So with shellac you avoid the whole clean up mess.  And, because it's alcohol based,  it won't freeze so I can use it most of the winter.

Below you can see the untreated end and the treated end after a few days in the furnace room, so you can see it really does work.  Wood dries quickest out the ends, which cause stress as the rest of the piece dries, and the result is end checks.  That's one reason why you never check moisture content on the ends of boards.


Unpainted

Painted


 Last trick---take a piece of sandpaper about 4" by 4".  Rip a slot in the center and fold one piece down


Fold that half, now a quarter sheet, over the other half.  Then fold the top single sheet over...


The trick here is that at no point does the sandpaper rub on sandpaper, see below.  It also makes the piece easier to hold and use.   I picked this up from an old painter who worked off and on for my family when I was growing up.

Wednesday, November 23, 2011

Small Business Saturday Sale


 I'm extending the 20% off sale to include Cyber Week...
Happy Shopping!


This includes everything I make, from $30 Shaker Boxes to $2400 Chairs.


I have to  admit, things have been really really slow, like stop.  Times are tough, and I realize that everyone is having a hard time--wants have taken a back seat to needs, and I completely understand that.  I am actually dusting off my resume and going to try to find a job.  I'm not really sure if I should be telling my customers this, but anyway, there it is.  My costly forays into marketing have returned zip and so I figure I'll try honesty.  Things are slow, so I'm trying a sale to drum up business.  Some argue that you never cut the cost of high-end items because you de-value the brand, and I get that, but I would like to think that people are smart enough to know the difference.  These are different waters we are navigating and I for one think they call for a different approach.

Thursday, November 17, 2011

Home-Made Scrub Plane ( sort of )


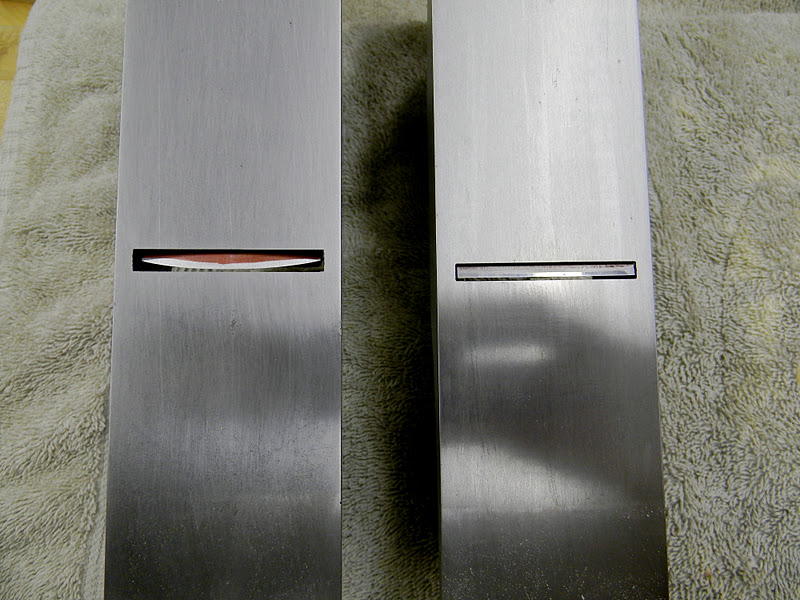
 Here you can see a standard store bought scrub plane.  This one is a Lie-Nielsen and it is a very nice plane.  Since buying it a few years ago, I have discovered a few things.  First off, this style of scrub plane is basically French in origin, or at least continental.  It doesn't have a frog or blade adjuster, which is fine.  It has a big wide open mouth, which is good so you can take think shavings and get the job done.  This plane is made to quickly flatten a board, think of it like a  hand powered jointer.  But there is one problem, it is too short to really flatten a whole board.  I think it works better in trouble areas--like a hump or a twisted board that has localized areas that need to be whacked down.

But given that it is so short, it will follow the board, rather than cut the high spots which leads to all the humps being leveled, and thus the board gets flat.  This plane does not take fine shavings or leave a fine finish.  As a matter of fact, the plane is used diagonally across the grain, so there is gonna be a fair bit of tearout.  But this will be cleaned up by the next plane, the jack plane (or better yet a jointer plane).  And finally a smoothing plane, but I'm getting ahead of myself.


Here you can see the Lie-Nielsen scrub next to a regular jack plane ( No. 5).   You can see the difference in length.  The scrub is about 10 inches and the jack is about 15 or so.  This may not sound like much but it is.  This extra length allow you to end up with a much flatter board.  But if you want to
quickly flatten a board, you need to make the blade more curved, a lot more curved.


 Above and below I'm getting ready to grind the curve, about an 8" radius.  Just set a compass to 8" and scribe am arc on the blade with a sharpie.  And then eyeball the angle and swing the blade back a forth, trying as best  you can to maintain a constant center.  I thought I had a jig for this bit I couldn't find it.  At any rate, just swing back and forth.  Be sure to mark the bevel with a sharpie so you can keep track of your progress.


You can see below how critical the marker is...getting close here.  Of course the middle will be the last to be done. 


 Above you can see I'm about there, and on the right it's done.  You don't need to grind right to the edge, the stones or in this case strip sander will finish it up.  Actually there is a school of thought that you should never grind right to the edge, always stop short as the temp at the edge, because it is so thin, can rapidly get hot enough to take the temper out.

 Above you can see a great way to cool a blade, simply set it on the support for my strip sander.  The aluminum quickly pulls the heat out with worrying about quenching problems.  This really does work.

I sharpen the blade on the strip sander with a fairly rough grit.  I don't really go nuts on sharpening a scrub plane blade.  This tool is not intended to take fine shavings, so save your time and get it quick sharp. 


 Again, hold the center point and swing the blade back and forth, trying to keep it steady. 


This sander works great for sharpening kitchen knives too.  I do it free hand and run the burr off by using the inside of the belt.  I always amazes me peoples tolerance for dull knives.  It seems that if the knife is only slightly sharper than a butter knife, it's ok, but I digress.


 Here is how I set the blade in the mouth.  You want a fair bit of blade sticking out.  Time for a little honesty...the radius on this blade is about 5", which really is too quick a curve.  I didn't measure it and after using the plane, I will have to regrind the blade.  But the theory is the same.  I never measure the thickness of shaving, but you want a pretty thick shaving coming out.  Back the frog right off and open the mouth right up.


Here you can see the difference between the jointer plane on the right and the shop made scrub plane on the left.  The scrub is used first to quickly flatten the board, diagonally corner to corner, and then the other way, and once it's flat, come back with the jointer plane and get it really flat, and clean up most tearout.  You can pick up a decent No. 5 jack plane pretty cheap and grind the blade to about an 8" radius and you have yourself a scrub plane.  This doesn't have to be a really nice plane, or even that flat.  If you want to spend time tuning a plane, do it to the jointer plane and the smoother, but those are other posts.  I honestly use a power jointer to flatten my boards, but if I get a plank that is too wide for my jointer, it's nice to have this ability so you can have a wide table top or bench seat without having to rip it apart and glue it back up.

On the home front, I broke my thumb splitting out some firewood (sledge hammer 1, thumb 0 ) so it looks like small projects for awhile, after Thanksgiving anyway.
Sunday, November 6, 2011

Shaker Boxes


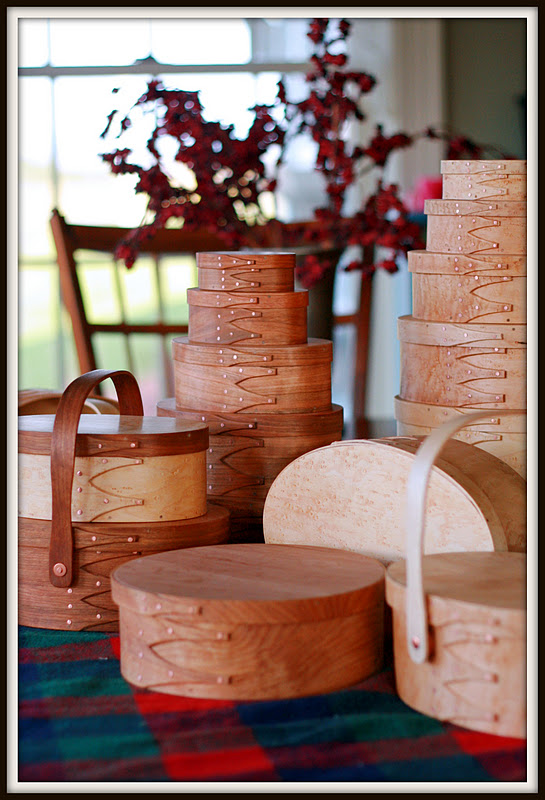
Here are some Shaker boxes I've been making.  Above are some in Birds-eye Maple, sizes 4 thru 0 bottom to top.   These boxes were, believe it or not, were original tupperware.


 The band bottoms are cut into fingers, the number depends on the size, and the both the top and bottom bands are boiled and bent around forms.  Then I use oval shaped pieces to hold the shape while the bands dry.


 Then the bands are held with copper tacks, bent over to form a single leg staple.


The lids and bottoms are carefully sanded to fit, and then held in place with wooden pegs.


Then the boxes are sanded and either finished with milk paint or Danish oil.  Then a wax coat and done.


 Here you can see how the boxes nest together.  One thing I like to do is when I paint with milk paint, I mix and paint right off.  This allows the paint to have different tones and it gives the box some texture.

 Here are some boxes in Cherry, sizes 4 thru 0.


 A #4 Cherry Swing handle


 4 thru 0


 This box is called a spit-box.  It's round and made of red birch, which mellows to a lovely yellowish red.


I really do enjoy making these boxes.  I like the fact that there is no glue, just tacks and pegs.  I'm gonna do a post soon where I will build a #3 with a divided tray in the top that could serve as a jewelry box, or troll bead box.

As for prices, the smallest ones, the 0,  are around $30 and the #4 is about $50.  The Birds-eye is a little more, and the swing handle #4's are $85 in Cherry.  Just email for more info.  I think the jewelry boxes are gonna be around $85.  Be sure to order early if you want them for Christmas.


Note:  I gotta give credit to Connie Gagnon for the pictures she has been taking for me.  These pics are amazing, as are all her photos.  She does not give herself enough credit.