Wednesday, December 4, 2013

New Blade


"God, how I ricochet between certainties and doubts"

Sylvia Plath


First off I have to apologize for my lack of substantive posts of late. Just life getting in the way I guess. Lots of personal stuff...waiting for sweet boredom. That'd be nice.


Anyway, enough about me. Above you see my three favorite spokeshaves. The one to the left is a Lee Valley round bottom, the middle one is a Lie-Nielsen, and the right one is a cherry one I built years ago before I even know how to build chairs. Its based on a kit from Daves Shaves as seen in American Woodworker years ago.  The Lie-Nielsen is a beautiful tool and I use it all the time. I'm not super crazy about the iron and will be replacing it come Christmas.
I love L-N tools, don't get me wrong and I have the credit card bills to prove it. I'm just not super crazy about the steel used for the irons. To me its just too hard. I like good old high carbon. Easy to sharpen and given it's small molecular structure it get wicked sharp. Or rather wicked shahhhp.


Which brings me to...my favorite spokeshave. Like I said I built this before I could build chairs. Back when I had a jobby job and all I did was build tools and jigs and such. Ahh the good old days. I don't build jigs or tools anymore. No time for that. Anyway, I built this spokeshave and despite all that is apparently wrong with it it works wonderfully.   The wear plate just ahead of the blade is maple and has a pretty significant groove worn in it from spindle work. If memory serves it had a brass plate but as the blade narrowed I switched it out for maple.


But all good things end. And the blade has been sharpened to the point of uselessness.  So I broke down and bought a new one from Ron Hock, making sure it was high carbon/. Above you can see the original (top) vs the new one. Quite a difference as you can see.


Here's a groove worn in the toe piece. While it opens the mouth, it hasn't proven to be a problem as it registers the spindle during the cut. 

Thursday, November 21, 2013

New Old Digs


Time marches on. Don't waste it assuming you'll always have more.

Dr. Z


Some of you may have known but for the last 15 years I have been running dry kilns and a solid fuel low pressure boiler.  Above you can see the boiler house.


Here's one way to bend wood. This birch board fell out of a pack and was placed under the third pack.  As the wood dried it of course shrank and in doing so the board was bent.  Gives you an idea how much wood moves when it dries.


Above you can see the moisture meter I use to check the progress of the drying.  


Above you can see the control panel for one of the kilns.  Below is the write up of the schedule I run to dry birch and maple.  The air temp. is called the dry bulb and the humidity level is called the wet bulb.  These two values are relatively close initially and pull apart as the wood dries. Otherwise the wood would dry too quickly at first and the wood would split and develop stresses. 


Below a better look at the controller.  This one is a Partlow two pen ( top value is the dry bulb and the bottom one is the wet bulb) circle chart.  It tracks the progress of the wood as it dries.  While I never really wanted to run dry kilns per se, it has allowed me to learn how wood dries and how to use that  to my advantage when building chairs.


Thursday, November 7, 2013

Student Chair


"Ishmael gave himself to the writing of it, and as he did so he understood this, too-that accident ruled every corner of the universe exceptt he chambers of the human heart."

David Guterson, Snow Falling on Cedars


Iv'e recently been building some rod back side chairs. I like the fact that the lower and upper turnings are basically the same...thin pieces that stylistically are very similar. But thin is the rub. Because they are very whippy and frankly and a pain in the ass to turn.  I guess part company with some builders in that I have no problem using a steady rest.  Guess I'm not a purist, or a Protestant.  One thing that does help a lot  is having two tool rests.  Before I would turn the left portion and then I'd have to disassemble the whole thing (tail stock, steady rest etc ) in order to move the rest to the left part.

After a big bench order I said enough of that and ordered an additional rest base.  I want to call it a banjo but I'm not sure that's right.  I like rodback spindles turned.  I built a big bench years ago and I shaved the spindles and I still don't like it. That's me.  I also like Tabasco and ketchup on my scrambled eggs.


Above you can see a rust eraser ( I think I got this from Lie-Nielsen ) and I use this thing all the time to buff up the tool rest.  I also use it to buff the part of the tool that contacts the rest.  I seem to get this weird black stuff that makes the tool sticky.


Below you can see Mark my latest student.  He picked a difficult chair, a Philly Comb Back Rocker and pulled it off swimmingly. He picked up the turning right off the bat and we had a great week.  One thing Mark allowed me to do was see how random I can sometimes be.  That is to say I know what the various processes and sizes need to be, but seeing the whole process thru a students eyes allowed me to see where confusion lies.  So after the class I spent better part of two days just organizing and labeling.  This has in turn helped me so thanks Mark.


And here's Mark and his chair. As I said he picked a very difficult chair and did a great job.


Wednesday, September 25, 2013

Time sinks


Deep sadness, overstruck by deeper strength

Union Officer describing Robt. E Lee at Appomattox Courthouse


After a rather disappointing last show, I decided that maybe I needed little more modern chair.  After all, not everyone lives in an old farmhouse.  So to that end I decided to come up with a modern chair that could be easily built in lots of 6 or 8.  I had designed a small side chair years ago for a potential client that never panned out so I decided to dust that off and make one up.  Above you can see the original quick and dirty prototype.  And below the side view.


I thought that a bent lamination would be the strongest way to make a bent back leg so I did that and broke the leg as I tried to glue it up. So I steamed more pieces and bent them, and then did up a bent lam.  Tick tock.


More views of the time consuming glue up.  I do have a vacuum bag that works great but still.  Its a messy time consuming process.


Below you can see exactly how far I got with this chair.  The seat and back are more bent laminations.   The back legs have to be fit with a plane because each back is different.  Each leg comes out a little different and has to be fitted. The seat pan has to be shaved to fit the rails.  Long process.

What I'm coming at with post is this.  As a professional chair maker I have to make every minute count.  I can't spend oodles of time on chairs or designs that I know will never pan out.  This chair will never look better than a $40 buck garage sale chair.  And I know that.  There comes a time in every design or build where you really have to think where is this going.  And where will it end?  What will the end product be?   Some designs are just dead ends. Time lost but lesson learned.

Some things you do are just dead ends...times sinks that will never go anywhere and you have to cut them loose or they will drag you down.


Sunday, September 15, 2013

Hints for Turning


I only that summer sang in me a little while,
that sings in me no more

Edna St. Vincent Millay


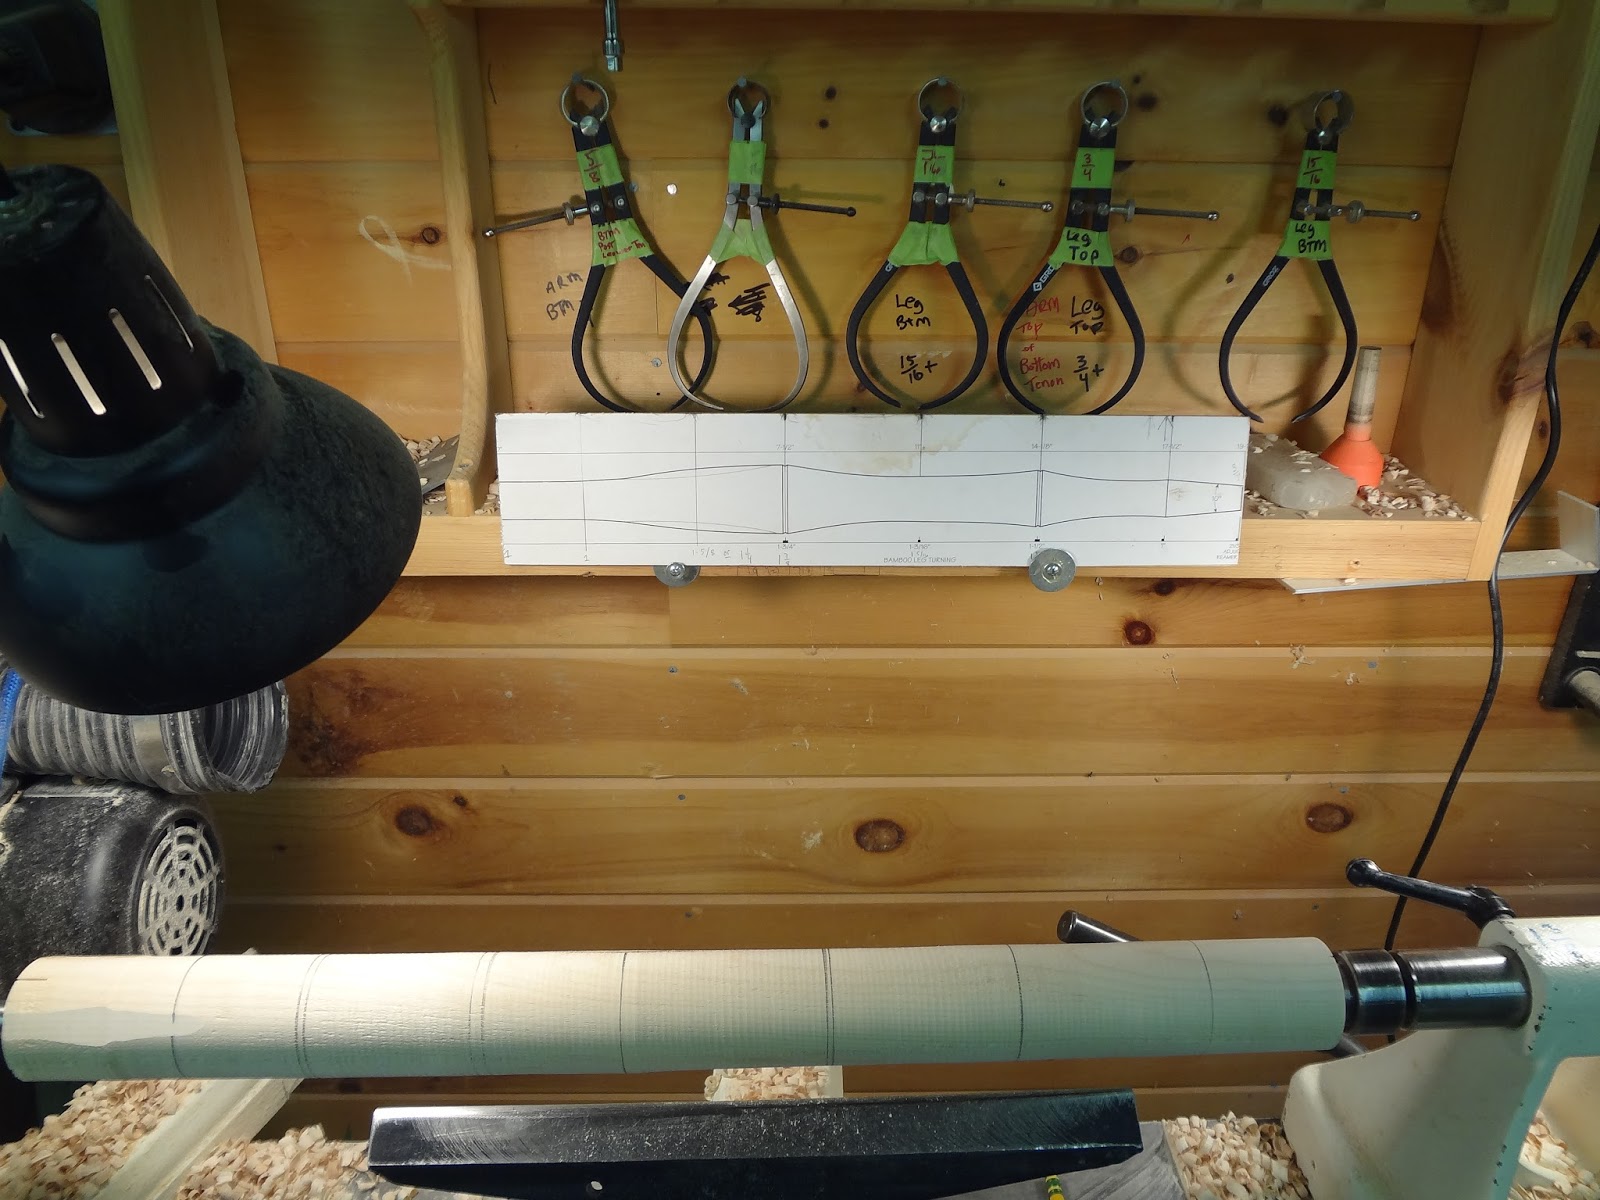
Above you can see the basic set-up I use for turning.  Nothing really special here but I do want to mention a few things that have helped me out.  First off I print or draw the pattern onto the a piece of thin plywood or wood and clearly mark all major and minor dimensions onto that.  That way they are clearly and consistently transferred to the piece.  No fiddling with a tape measure or piece of paper.


As to the major/minor dimensions.  I define major dimensions as "outside" dimensions, like the outside node of a bamboo turning, or the dimension of a tenon.  These are finite dimensions and are carefully measured with calipers.  Further, these are denoted with with one pencil line.  The "minor" dimensions represent, in this instance, the hollow between the nodes of this turning.  These are also measured and cut with a parting tool as well, but when I come to actually turn them, as long as it looks good and flows it's fine. I denote these with two lines.  This is all pretty obvious stuff but it really does help with consistency. 


This next step was a major step forward for me.  I used to struggle with vibration, even on big pieces.  And while it was very obvious now, I used to simply place the blank on the lathe and use the tail stock to force the drive center into the piece.  Which of course put a lot of pressure on the ends and as the middle was cut away, vibration resulted.

Now I either hammer the drive center into the end or if the blank is square I make diagonal cuts on the drive end that the drive center can bite into, and then as I'm turning the piece I can back the pressure of the tail stock and reduce the chance of vibration.


Above is a view of the a bamboo turning that shows what I mean by major and minor measures.   The hills are the major dimensions and and the valleys are the minor ones.


This is a shot of the calipers I use.  I used to only have a couple and I would measure each dimension and transfer to the piece.  And I can tell you if you want a slow, inconsistent way to do it that's one.  I also use a Galbert Caliper which works great.  But for really precise measures I prefer calipers.  You can't tell but I actually froze the thumb nuts with some super glue so they would not get out of whack.

Like I said, just a couple hints that have helped me out.   Now off to pick blueberries with the kids!